
Some desserts just stick with you. This apple slice is one of them.
I first made this on a quiet Sunday afternoon, and honestly, I was not expecting much. It looked simple. A basic bake, three layers, nothing fancy. But the moment I pulled it from the fridge the next morning and cut into it… I completely understood the hype.
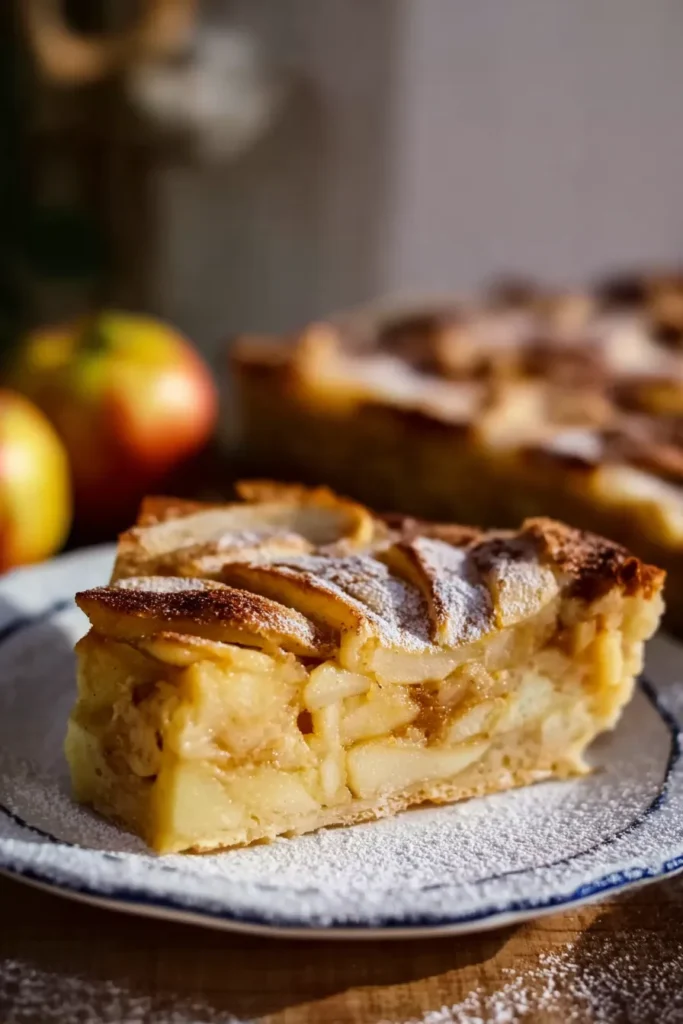
You get three gorgeous layers in every single bite.
A buttery, chewy coconut base. A thick, soft apple filling. And a creamy, cinnamon-dusted custard sitting right on top.
It is the kind of dessert you find at old-school bakeries. The ones that smell like vanilla and warm sugar the second you walk in.
The good news? You do not need any fancy equipment to pull this off. No stand mixer. No special tools. Just a couple of mixing bowls and a square baking tin. That is genuinely it.
What makes this recipe work so well is the contrast. The chewy base holds everything together. The apples bring softness and sweetness. And the sour cream topping? That is the real secret. It bakes into something almost custard-like. Tangy, rich, and just indulgent enough to feel like a treat.
Let us talk ingredients first.
What You Will Need (And Why It Matters)
Every ingredient here has a job. Skip or swap carelessly, and the whole thing falls apart. So let me walk you through the important ones.
Cake flour is not optional for the base. Regular all-purpose flour will make the crust denser and heavier. Cake flour gives it that soft, almost melt-in-your-mouth crumb. Think of it like the difference between a thick bread roll and a delicate sponge. Same idea.
Desiccated coconut adds chewiness and a subtle tropical fragrance. It makes the base feel interesting instead of just… flat. Use unsweetened coconut if you can find it.
Tinned apples are your best friend here. They are already soft, perfectly cooked, and ready to go. If you prefer fresh apples, lightly stew them first until they are completely tender. The key word is completely. Underdone apples will stay firm and ruin the texture.
Full-fat sour cream is non-negotiable. This is not a place to cut calories. Light sour cream does not set properly in the oven. You will end up with a runny, sad topping instead of that beautiful custard layer. Trust me on this one.

Here is the full ingredient list. Measure everything before you start. Baking rewards the organized and punishes the impatient.
Recipe Timing: Prep Time: 20 minutes | Cook Time: 45 minutes | Total Time: 1 hour 5 minutes | Servings: 12 | Difficulty: Easy
| Ingredient | Quantity | Notes |
|---|---|---|
| Cake flour | 1 cup / 150g / 5ozs | Creates a tender, light crust |
| Baking powder | 2 teaspoons | Helps the dense base rise slightly |
| Desiccated coconut | 1 cup / 85g / 3ozs | Unsweetened works best here |
| Caster or superfine sugar | 1/2 cup / 110g / 3.9ozs | Dissolves easily into the base dough |
| Salt | Pinch | Enhances all the sweet flavors |
| Melted butter | 125g / 4ozs | Binds the dry crust ingredients together |
| Tin of apples | 400g / 14oz tin | Or use lightly stewed fresh apples |
| Sugar (for apples) | 3 tablespoons | Sweetens the tart apple filling |
| Sour cream | 300g / 10.6ozs | Must be full-fat, not light |
| Sugar (for topping) | 2 tablespoons | Sweetens the tangy sour cream |
| Egg | 1 large | Sets the sour cream like custard |
| Cinnamon sugar | 1.5 tablespoons | 1.25 tbsp sugar + 1 tsp cinnamon |
| Icing sugar | Optional | For dusting the final chilled slice |
I always recommend using a digital kitchen scale when baking. Measuring flour by volume can be wildly inconsistent depending on how you scoop. Weighing it gives you the same result every single time.
Once everything is measured and sitting on your counter, you are ready to go.
How to Make It, Step by Step
Step 1: Get Your Oven and Pan Ready
Preheat your oven to 350°F (175°C).
While it heats up, grab your eight-inch square baking tin. Line the base and all four sides completely with parchment paper. Here is the important part: leave some paper hanging over the edges. Those little overhang flaps become your handles later. You will thank yourself when it is time to lift the slice out cleanly.
Step 2: Make the Coconut Base
Grab a large mixing bowl. Add in:
- The cake flour
- The baking powder
- The desiccated coconut
- The caster sugar
- Your pinch of salt
Give it a good whisk until everything is evenly mixed together. Now pour in the warm melted butter. Stir it all together with a wooden spoon.
What you are looking for is a texture that resembles wet, clumpy sand. It will not look like traditional dough. That is completely normal.

Tip the mixture into your prepared tin. Spread it out so it covers the entire bottom evenly. Use the back of a metal spoon to press it down firmly. You want a compact, flat layer with no gaps or loose bits.
Pop it into the oven and bake for 15 minutes. You are looking for the edges to turn a light golden brown. Pull it out and let it rest for a few minutes while you prep the next layer.
Step 3: Prepare the Apple Layer
If you are using tinned apples, drain them really well. Like, really well. Excess liquid is the number one reason this bake goes soggy. Press them gently in a colander if you need to.
Place the drained apples in a bowl. Add the three tablespoons of sugar. Toss them together until every piece is lightly coated.

Spread the apples evenly over your warm baked base. Press them down gently so they sit in a nice, flat layer.
Step 4: Mix and Pour the Sour Cream Topping
In a small bowl, combine:
- The full-fat sour cream
- The egg
- Two tablespoons of sugar
Whisk it vigorously until the mixture is completely smooth and a pale, creamy yellow. Pour it directly over the apple layer. Tilt the pan gently to help it flow into all the corners. Every apple should be covered.
Now sprinkle the cinnamon sugar blend evenly across the top. It will create a beautiful speckled pattern on the surface. And your kitchen will smell absolutely incredible within minutes of putting it back in the oven.
Return the tin to the oven. Bake for another 20 to 25 minutes.
Step 5: Know When It Is Done
Watch the slice carefully during the last five minutes.
The sour cream layer should be set. Give the pan a gentle shake. If the center still wobbles like liquid, give it a few more minutes. The edges should be a lovely deep golden color when it is ready.
Once it is done, remove it from the oven and place the tin on a wire cooling rack.
And now… you wait.
The Hardest Part: Patience
I know. It looks incredible. You want to dig in immediately. But cutting into this slice while it is still warm is the fastest way to ruin all your hard work. The layers will slide, the custard will ooze, and your squares will look like a beautiful disaster.
Here is what you need to do:
- Let it cool in the tin completely at room temperature
- Then transfer it to the refrigerator
- Chill for at least 2 to 3 hours
- Overnight is genuinely better
The sour cream custard needs that full chill time to firm up. By the next morning, it cuts like a dream.
Cutting and Serving
When you are ready to serve, grip those parchment paper overhangs firmly and lift the whole block out of the tin. Place it onto a large cutting board.
Use a large, sharp chef’s knife. Between each cut, wipe the blade with a warm, damp cloth. This one small step makes every square look clean and bakery-perfect instead of smeared and messy.
Slice into 12 or 16 squares depending on how generous you are feeling.
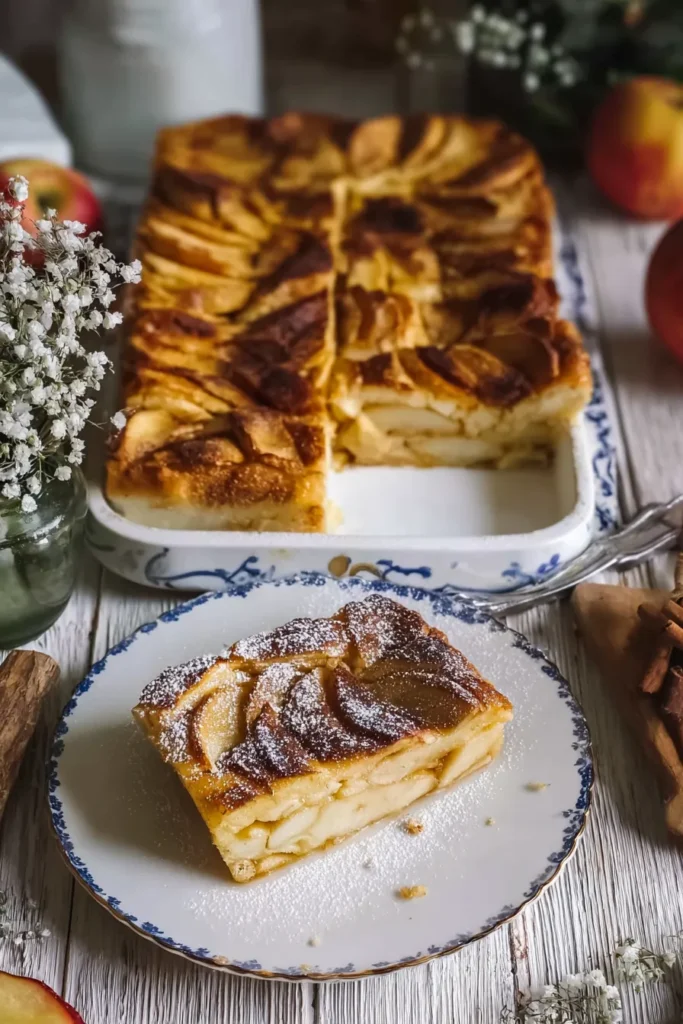
Want to make it look extra special? Dust the top lightly with icing sugar just before serving. It gives it that professional bakery finish without any extra effort.
Serve it cold, straight from the fridge. It is incredible alongside a hot cup of black tea. Equally good with a strong morning coffee. And here is something I noticed: the flavors actually improve on day two. The base softens slightly, the layers meld together, and every bite tastes even better than the first day.
How to Store Leftovers
Storing this apple slice is easy.
- Place squares into an airtight container
- Keep it in the refrigerator at all times (it contains dairy and egg)
- It stays fresh for up to 5 days
The base will soften a little over time. Plenty of people actually prefer it that way by day three. Softer, more unified, almost like a proper chilled dessert bar.
Frequently Asked Questions
Can I substitute regular flour for the cake flour?
Yes, you can use all-purpose flour in a pinch. Just know the base will come out a bit heavier and denser. Cake flour gives the crust a noticeably lighter, more delicate crumb. Worth seeking out if you can.
Why did my base turn out completely soggy?
Almost always comes down to the apples holding too much liquid. Drain tinned apples aggressively before layering. If you stewed fresh apples, cook them long enough that most of the moisture has evaporated before using them.
Can I freeze this apple slice?
Absolutely. It freezes really well. Cut it into portions, wrap each piece tightly in plastic wrap, and store in a freezer-safe bag. It keeps well for up to two months. Thaw in the fridge overnight before eating.
Can I use a different fruit instead of apples?
Yes. Tinned or stewed pears are a beautiful swap. Drained tinned peaches or apricots also work wonderfully. The rule is simple: whatever fruit you use, make sure it is soft and well-drained.
Can I make this the day before an event?
Not only can you, I would strongly recommend it. A full night in the fridge makes the layers firm, the slices clean, and the flavors deeper. This is genuinely one of those bakes that is better made ahead.
This apple slice has earned a permanent spot in my recipe rotation. It is simple enough for a weeknight bake and impressive enough to bring to any gathering. Three layers, one tin, and absolutely no stress.
Give it a try. You might just fall in love with it too.
Three-Layer Sour Cream Apple Slice
Ingredients
Coconut Base
- 1 cup cake flour 150g; creates a tender crust
- 2 teaspoons baking powder
- 1 cup desiccated coconut 85g; unsweetened preferred
- 1/2 cup caster sugar 110g
- 1 pinch salt
- 125 g butter melted
Apple Filling
- 400 g tinned apples drained well; or stewed fresh apples
- 3 tablespoons sugar for coating apples
Sour Cream Topping
- 300 g sour cream must be full-fat
- 1 large egg
- 2 tablespoons sugar for topping
- 1.5 tablespoons cinnamon sugar 1.25 tbsp sugar + 1 tsp cinnamon
Instructions
- Preheat your oven to 350°F (175°C). Line an 8-inch square baking tin with parchment paper, leaving an overhang on the sides to use as handles.
- In a large bowl, whisk together cake flour, baking powder, desiccated coconut, caster sugar, and salt. Pour in melted butter and stir until it looks like wet, clumpy sand.
- Press the mixture firmly into the base of the tin. Bake for 15 minutes until edges are light golden brown. Let rest for a few minutes.
- Drain apples thoroughly to prevent sogginess. Toss with 3 tablespoons of sugar and spread evenly over the pre-baked base.
- Whisk sour cream, egg, and 2 tablespoons of sugar until smooth. Pour over the apples and sprinkle with cinnamon sugar.
- Bake for 20 to 25 minutes until the topping is set. The center should not wobble like liquid.
- Cool completely in the tin at room temperature, then refrigerate for at least 3 hours (overnight is best) before slicing with a clean, warm knife.