
You know that moment when you walk into a kitchen and smell fresh bread baking?
Pure magic.
Today I’m sharing my go-to peanut butter bread recipe. It’s one of those recipes that feels like a warm hug – simple, comforting, and made with stuff you probably already have in your pantry.
This isn’t your typical quick bread. It’s got history. It’s got soul. And honestly? It’s become my secret weapon for weekend breakfasts and after-school snacks.
Here’s what I love most about it.
One bowl. Ten minutes of actual work. No fancy mixer needed.
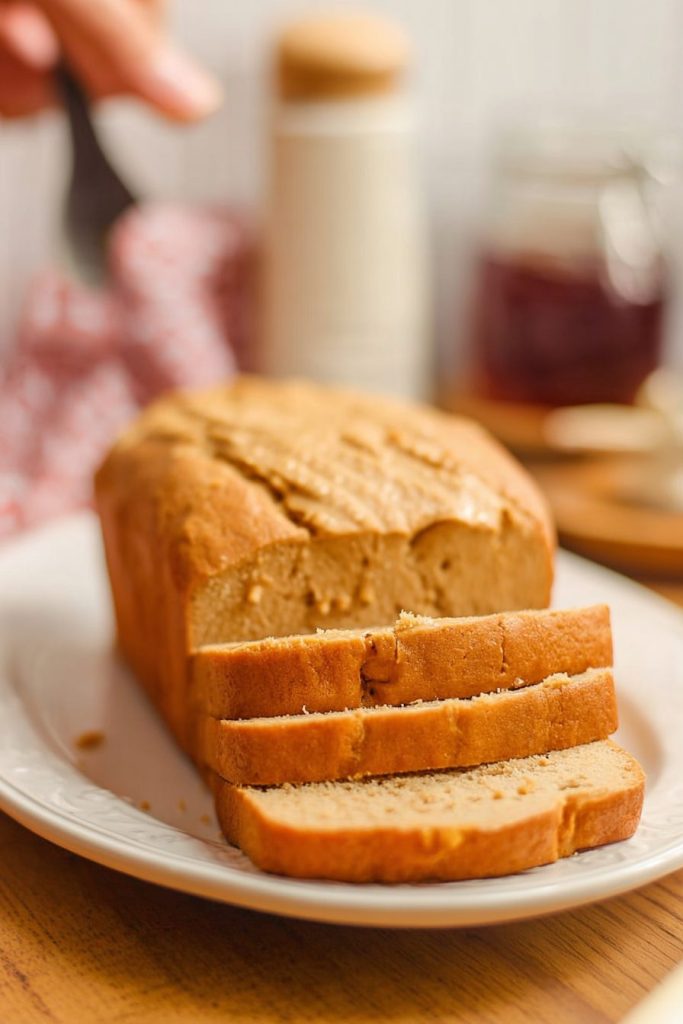
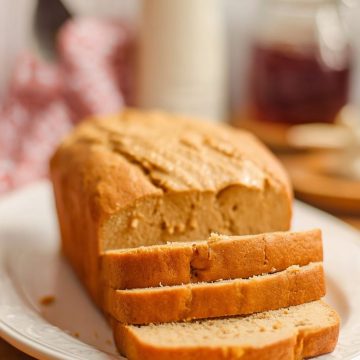
I’ve baked this bread more times than I can count (seriously, my family requests it weekly). The texture hits that sweet spot – not too dense, not too fluffy. Just right. And the peanut butter flavor? Bold enough to taste but not so strong it makes you reach for water.
My kids love it toasted with strawberry jam. I’m more of a “slather on extra peanut butter” kind of person. Judge me if you want.
Why This Recipe Works So Well
The Cleanup is Minimal
I hate washing dishes. Like, really hate it.
This recipe uses one bowl. That’s it. Mix everything, pour it in a pan, and you’re done. More time eating warm bread with your people. Less time elbow-deep in soapy water.
Your Wallet Will Thank You
No weird ingredients here. No trip to three different grocery stores. Just flour, sugar, peanut butter, and a few other basics you definitely have right now.
I’ve made this bread on tight-budget weeks. Works every time.
It’s Seriously Versatile
Want breakfast? Toast a slice and add jam.
Need a lunchbox treat? Pack it plain.
Feeling fancy? Serve it with vanilla ice cream for dessert.
I’ve even crumbled it over yogurt. Don’t knock it till you try it.
Here’s the Wild Part – No Butter
Zero butter. Zero oil.
The peanut butter does all the work. It keeps the bread moist, adds richness, and saves you money. Plus, it’s lighter than most quick breads without tasting “healthy” (which is usually code for cardboard).
A Little History Lesson
This bread has Depression-era roots. Back then, families had to get creative with limited ingredients. Butter was expensive and hard to find. But peanut butter? Affordable and packed with fat and protein.
Smart cooks figured out it could replace butter in baking.
Genius move.

I’ve tweaked the original recipe by adding an egg. It makes the crumb lighter and more tender. My great-grandmother probably would’ve added one too if eggs hadn’t been rationed.
The best part?
This recipe is basically foolproof. I’ve taught my 12-year-old nephew to make it. If he can do it without burning down my kitchen, you definitely can too.
You don’t need to stress about perfect mixing or exact measurements. The batter is forgiving. Just whisk it up, pour it in your pan, and let the oven do its thing.
Fair warning though.
Once you bake this bread, you’ll find yourself making it constantly. The ingredients are so simple that you’ll always have them on hand. And once that craving hits? There’s no fighting it.
What You’ll Need
Let me break down each ingredient and why it matters. This isn’t just a shopping list – it’s your roadmap to peanut butter bread success.
| Ingredient | Quantity | Why It Matters |
|---|---|---|
| All-purpose flour | 2 cups (250g) | The foundation – gives your bread structure |
| Baking powder | 1 tablespoon | Your rising agent (no yeast waiting required!) |
| Salt | 1 teaspoon | Brings out the peanut butter flavor |
| Granulated sugar | ¾ cup (150g) | Balances the nutty taste, adds sweetness |
| Large egg | 1 egg | Creates tender texture – must be room temp |
| Milk | 1 cup (237ml) | Moisture and richness (2% or whole works best) |
| Creamy peanut butter | ½ cup (130g) | The star of the show – use regular, not natural |
Quick tip: Stick with regular creamy peanut butter. I know natural peanut butter sounds healthier, but trust me on this one. The stabilizers in regular peanut butter create better texture. I learned this the hard way after a too-oily disaster.
Let’s Bake This Thing
Step 1: Get Everything Ready
Turn your oven to 375°F (190°C).
While it’s heating up, line your 9×5 inch loaf pan with parchment paper. I used to just grease the pan, but parchment makes your life SO much easier. The bread literally lifts right out.
Step 2: Mix Your Dry Stuff
Dump the flour, baking powder, salt, and sugar into your big bowl.
Whisk it all together really well. This isn’t the time to be lazy about it. You want that baking powder evenly distributed so you don’t bite into a bitter pocket later. (Yes, that happened to me once. Not fun.)
Step 3: Add Everything Else
Here’s where it gets interesting.
Add your egg, milk, and peanut butter right into that same bowl. No separate bowls. No fancy techniques. Everything just goes in together.
I love this step because it feels wrong but works perfectly.
Step 4: Whisk It Up
Start whisking. The batter will look weird at first – chunky and separated.
Keep going.
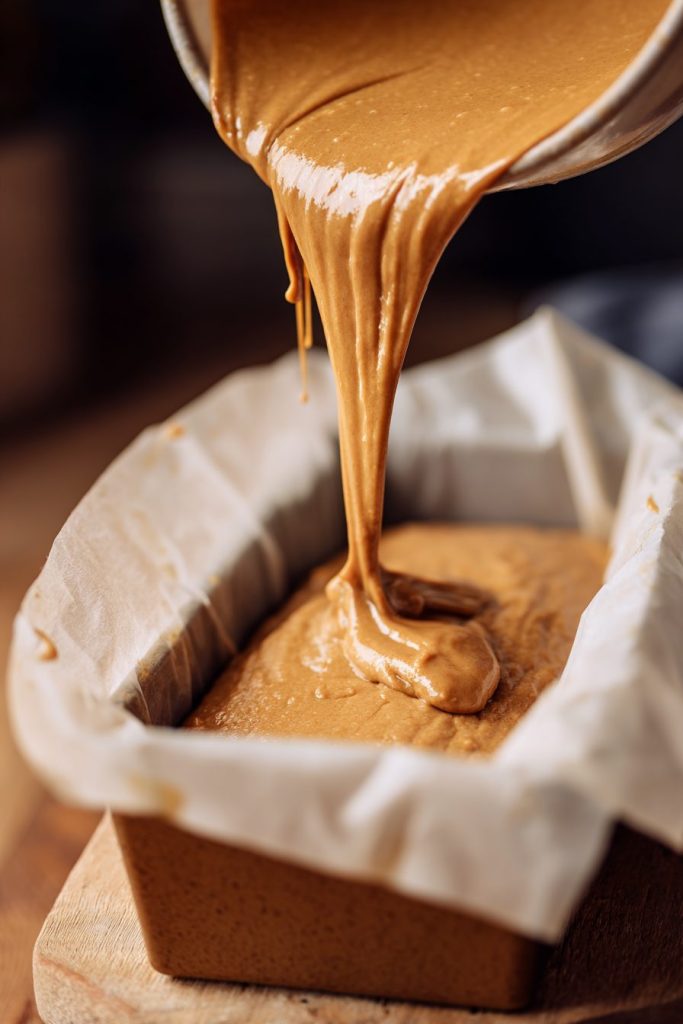
After about two minutes, you’ll have a smooth, thick batter. It’s thicker than regular cake batter. Think… somewhere between pancake batter and cookie dough. The color will be this nice pale brown once the peanut butter fully mixes in.

Step 5: Into the Pan
Pour that beautiful batter into your prepared pan. Use a spatula to smooth out the top.
Doesn’t have to be perfect. Mine never is.
Pop it in the oven and set a timer for 50 minutes. Then walk away. No peeking! Every time you open the oven door, you lose heat.
The bread is done when a toothpick stuck in the center comes out clean or with just a few crumbs. If it’s still wet, give it another 5-10 minutes.
Step 6: The Hardest Part
Let it cool in the pan for 10 minutes. Exactly 10 minutes.
This lets the structure set so it doesn’t fall apart when you move it.
Then transfer it to a wire rack to cool completely.
I know. I KNOW. You want to cut into it right now.
But warm bread = crumbly mess. Cool bread = clean slices. Your patience will pay off.
Tips I Wish Someone Had Told Me
Room Temperature Matters
Cold eggs and milk don’t mix well with the other ingredients. You’ll get lumps.
Take them out of the fridge 30 minutes before you start baking. Or do what I do – put the egg in warm water for 5 minutes and microwave the milk for 15 seconds.
Stop Whisking
The second everything looks combined, put the whisk down and step away.
Overmixing develops gluten. Gluten makes bread tough and chewy. We want soft and tender. So mix just enough and not a second more.
Your Oven Might Lie
Not all ovens are created equal. Mine runs 10 degrees hotter than it says.
Start checking at 50 minutes with a toothpick. If it comes out wet, keep baking in 5-minute intervals. Better slightly over-baked than gummy in the middle.
Wait Before Slicing
Use a sharp serrated knife (like a bread knife). And seriously – wait until it’s completely cool.
I’ve ruined too many loaves by being impatient. Hot bread compresses under the knife and turns into a smooshed mess.
Want to Add Stuff?
Chocolate chips? Sure. Nuts? Go for it.
But keep it to ¾ cup max. Too many add-ins and your bread won’t hold together properly. Also, fold them in gently at the very end. Don’t stir aggressively or you’ll over-mix.

Making It Last (And Other Important Stuff)
Storage 101
Room temperature works great for 3-4 days. Just stick slices in an airtight container.
Fun fact: This bread tastes better on day two. The flavors blend together overnight. It’s like magic, but it’s actually just chemistry.
Need it to last longer?
Refrigerate it. Wrap the whole loaf in plastic wrap or store slices in a sealed container. It’ll stay fresh for a full week. When you want some, pop a slice in the microwave for 10-15 seconds. Boom – fresh-baked taste again.
The freezer is your best friend for long-term storage:
- Slice the entire loaf first
- Lay slices flat on a baking sheet
- Freeze for an hour until solid
- Transfer to a freezer bag
This keeps slices from sticking together in one giant frozen brick. Frozen slices last three months and go straight from freezer to toaster. Perfect for rushed mornings.
Ways to Change It Up
The basic recipe is fantastic. But sometimes you want to experiment, right?
For Chocolate Fans
Fold in ½ cup of chocolate chips before baking. Peanut butter + chocolate = basically a Reese’s cup in bread form. My teenagers go crazy for this version.
Extra Nutty
Throw in ⅓ cup of chopped peanuts or walnuts. Adds crunch and protein. My husband prefers this version because it feels more “substantial.”
Sweeter Morning Bread
Bump the sugar up to 1 cup. Then drizzle a simple glaze over the cooled loaf (just powdered sugar mixed with a little milk). This turns it into legitimate dessert territory.
Fruity Twist
Mix in ½ cup of dried cranberries or banana chips. Sounds weird, tastes amazing. The fruit adds little pops of sweetness throughout.
No Dairy? No Problem
Swap regular milk for almond, oat, or soy milk. Use the exact same amount. I’ve tested all three and they all work perfectly.
Your Questions Answered
Can I use crunchy peanut butter?
I haven’t personally tried it, but it should work fine.
Your bread will just have little peanut pieces throughout. Some people love that texture. The mixing might take an extra minute to get everything smooth. If you try it, let me know how it turns out!
Why does my bread dome up in the middle?
That’s actually a good sign!
The dome means your bread rose properly. Here’s what happens: the edges set first because they’re closer to the hot pan. The center keeps rising because it heats more slowly. That’s why you get that classic rounded top.
All quick breads do this. It’s not a mistake – it’s science.
Can I make muffins instead?
Absolutely! I do this when I need individual servings.
Divide the batter among 12 lined muffin cups. Fill each about two-thirds full. Bake for 18-22 minutes instead of 50-60. Test with a toothpick just like the loaf.
Pro tip: Muffins freeze even better than loaves. Great for meal prep.
Help! My bread came out too dense.
Two main culprits here:
First, you might have over-mixed the batter. Remember – whisk just until combined, then stop.
Second, check your peanut butter. Natural or oil-separated varieties don’t work as well. And make sure your baking powder isn’t expired. Old baking powder = no rise = dense bread.
Can I use this for sandwiches?
Yes! The texture holds up really well.
I’ve made some killer sandwiches with this bread:
- Cream cheese and jam
- Banana and honey
- The ultimate PB&J (because why not double down on peanut butter?)
The built-in peanut butter flavor means you need less spread. My kids love taking these sandwiches to school.
Here’s the Thing
This peanut butter bread has become my comfort baking project. The one I turn to when life gets hectic and I need something easy and reliable.
It works on busy Tuesday mornings. It works on lazy Sunday afternoons.
You can dress it up or keep it simple. Add chocolate chips or leave them out. Toast it or eat it plain. There’s no wrong way to enjoy it.
My advice? Make a loaf this weekend. See how your family reacts. I’m betting they’ll ask you to make it again next weekend.
And the weekend after that.
Happy baking!
Easy Peanut Butter Bread
Ingredients
- 2 cups all-purpose flour
- 1 tablespoon baking powder
- 1 teaspoon salt
- 3/4 cup granulated sugar
- 1 large egg room temperature
- 1 cup milk 2% or whole, room temperature
- 1/2 cup creamy peanut butter regular, not natural
Instructions
- Preheat your oven to 375°F (190°C). Line a 9×5 inch loaf pan with parchment paper.
- In a large bowl, whisk together the flour, baking powder, salt, and sugar until well combined. Make sure the baking powder is evenly distributed.
- Add the egg, milk, and peanut butter directly into the same bowl with the dry ingredients.
- Whisk for about 2 minutes until you have a smooth, thick batter. The batter should be pale brown and thicker than regular cake batter.
- Pour the batter into the prepared loaf pan and smooth the top with a spatula.
- Bake for 50-60 minutes, until a toothpick inserted in the center comes out clean or with just a few crumbs. If still wet, bake for another 5-10 minutes.
- Let the bread cool in the pan for exactly 10 minutes, then transfer to a wire rack to cool completely before slicing.