
There’s something magical about the aroma of bibingka baking in the oven. The sweet coconut fragrance fills my kitchen and instantly transports me back to childhood celebrations. This Filipino rice cake has been a beloved tradition for generations, and today I’m sharing my foolproof recipe.
I’ve spent years perfecting this bibingka recipe, and I’m thrilled to finally share it with you. What makes this version special is the addition of macapuno, those sweet coconut strings that add incredible texture. Every bite delivers a perfect balance of soft, fluffy cake and chewy coconut goodness.

The best part? You don’t need specialized equipment or hard-to-find ingredients. With just a few simple components, you’ll create an authentic Filipino dessert that rivals any bakery version. I’ve made this recipe dozens of times for family gatherings, and it never fails to impress.
Whether you’re Filipino and craving a taste of home or simply curious about international desserts, this bibingka will win your heart. The combination of rice flour creates a unique texture that’s lighter than traditional cake but more substantial than pudding. It’s absolutely perfect with your morning coffee or as an afternoon treat.
Why This Bibingka Recipe is a Must-Try
Authentic Filipino flavor: This recipe captures traditional bibingka essence while remaining accessible for home cooks everywhere. The coconut milk and macapuno create that signature tropical taste you’re craving.
Quick and simple: You’ll have this beautiful dessert ready in just 25 minutes total. No complicated techniques or special skills required—just straightforward mixing and baking that anyone can master.
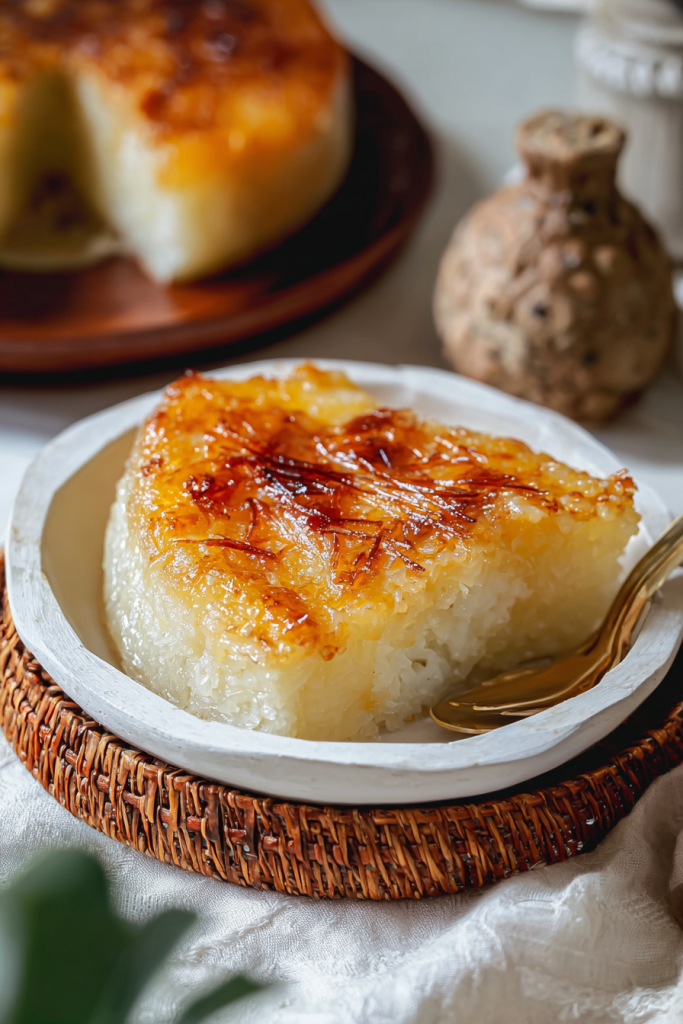
Perfectly balanced sweetness: Unlike overly sugary desserts, this bibingka offers subtle sweetness that lets the coconut shine through. The caramelized sugar topping adds just enough crunch without overwhelming your palate.
Impressive presentation: The banana leaf lining creates a stunning visual that makes this humble cake look restaurant-worthy. Your guests will think you spent hours preparing this elegant dessert.
Versatile serving options: Enjoy it warm right from the oven, at room temperature, or even chilled. Each temperature brings out different flavor notes and textures to discover.
Cultural connection: Making bibingka connects you to Filipino culinary heritage and traditions. It’s more than just a recipe—it’s a delicious piece of cultural history you can share.
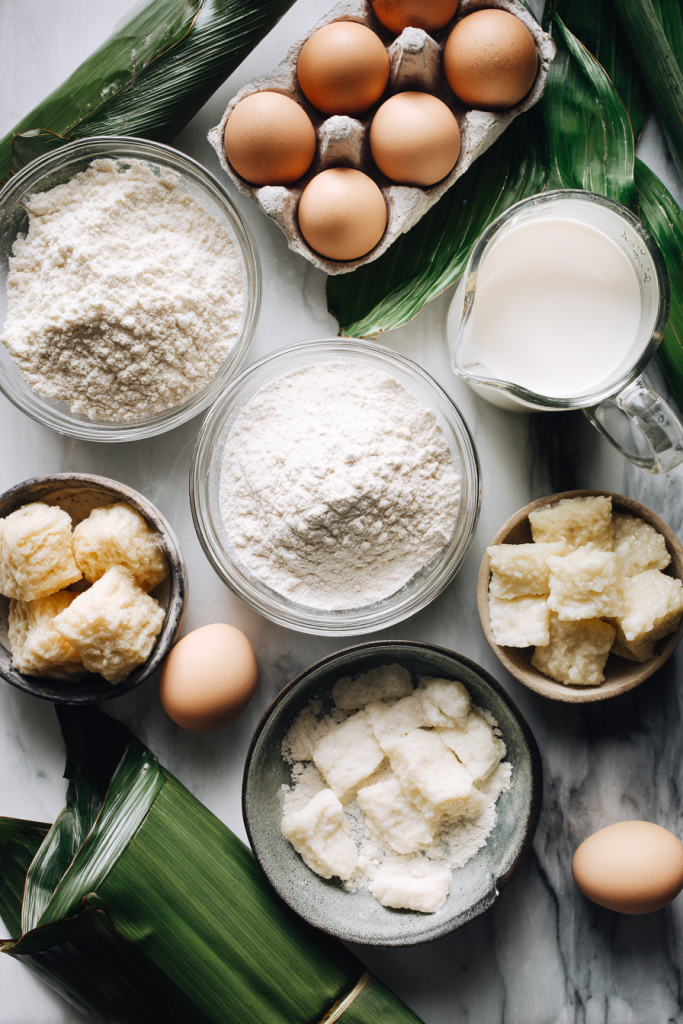
Essential Bibingka Ingredients
Let me walk you through each ingredient and why it matters for perfect bibingka.
For the Cake Base
Unsalted butter (2 ounces, melted): This adds richness and helps create that tender crumb texture. Melted butter incorporates more easily into the batter than softened butter would.
White rice flour (3 ounces): The foundation of authentic bibingka texture. Rice flour creates a lighter, more delicate crumb than wheat flour ever could achieve.
Sweet rice flour (1.25 ounces, Mochiko preferred): This is your secret weapon for chewiness. Mochiko brand sweet rice flour provides the perfect sticky texture that makes bibingka unique.
Baking powder (1.5 teaspoons): Gives your cake that beautiful rise and fluffy texture. Fresh baking powder is essential—check the expiration date before using.
Kosher salt (1/8 teaspoon): Enhances all the other flavors and prevents the cake from tasting flat. Never skip the salt in dessert recipes.
For the Sweetness
Sugar (2.75 ounces plus extra for topping): Provides just enough sweetness without overpowering the coconut. The extra sugar creates a crispy, caramelized top layer.
Full-fat coconut milk (3/4 cup): This is non-negotiable for authentic flavor. Light coconut milk won’t deliver the richness you need for proper bibingka.
Large egg (1): Binds everything together and adds moisture. Room temperature eggs incorporate more smoothly into the batter.
For the Special Touch
Macapuno (3 ounces): These sweet coconut strings transform ordinary bibingka into something extraordinary. Their chewy texture contrasts beautifully with the soft cake.
Banana leaves (optional): While optional, they add authentic aroma and stunning presentation. The leaves impart a subtle grassy flavor that’s traditional in Filipino cooking.
Ingredient Table
| Ingredient | Quantity | Notes |
|---|---|---|
| Unsalted butter | 2 oz (melted) | Room temperature preferred |
| White rice flour | 3 oz | Bob’s Red Mill works well |
| Sweet rice flour | 1.25 oz | Mochiko brand recommended |
| Baking powder | 1.5 tsp | Check freshness date |
| Kosher salt | 1/8 tsp | Fine sea salt also works |
| Sugar | 2.75 oz + extra | White granulated sugar |
| Coconut milk | 3/4 cup | Full-fat only, shake well |
| Large egg | 1 | Room temperature ideal |
| Macapuno | 3 oz | Available at Asian markets |
| Banana leaves | Optional | Fresh or frozen both work |
Prep Time: 10 minutes | Cook Time: 15 minutes | Total Time: 25 minutes
Servings: 4 | Difficulty: Easy
COOKING INSTRUCTIONS & TIPS
Now let’s get cooking! I’ll guide you through each step with tips I’ve learned from making this countless times.
How to Make Irresistible Bibingka Filipino Rice Cake
Step 1: Prepare Your Oven and Pan
Start by positioning your oven rack in the middle position for even heat distribution. Preheat your oven to 375°F (190°C) while you prepare everything else.
If using banana leaves, rinse them thoroughly under cold water and pat completely dry. Hold each leaf piece over a medium-high gas flame for about 15 seconds per side. The leaves will become soft, pliable, and release their aromatic oils.
Step 2: Line and Grease Your Pan
Lay your prepared banana leaf pieces in an 8-inch round pan, ensuring complete coverage of bottom and sides. The leaves should overlap slightly to prevent batter leakage.
Brush the banana leaves generously with 1/2 ounce (1 tablespoon) of melted butter. This prevents sticking and adds extra richness.
No banana leaves? Simply grease your 8-inch pan thoroughly with butter or non-stick spray. Line the bottom with parchment paper cut to fit perfectly.
Step 3: Mix Your Dry Ingredients
Grab a medium bowl and combine white rice flour, sweet rice flour, baking powder, and salt. Whisk these dry ingredients together for about 30 seconds until everything is evenly distributed.
This step ensures your leavening distributes evenly throughout the cake. No one wants bites with too much baking powder flavor.
Step 4: Combine Wet Ingredients
In a large bowl, whisk together 1 ounce (2 tablespoons) melted butter, sugar, coconut milk, and egg. Whisk vigorously for about one minute until the sugar dissolves completely and the mixture becomes smooth.
The egg should be fully incorporated with no streaks remaining. This creates the base of your flavorful batter.
Step 5: Create Your Batter
Add your dry flour mixture to the wet ingredients all at once. Whisk everything together until you achieve a smooth, lump-free batter. This should take about 45 seconds of steady whisking.
Don’t worry about overmixing here—rice flour doesn’t develop gluten like wheat flour does. You want a completely smooth consistency.
Step 6: Transfer to Pan
Using a flexible spatula, give your batter one or two gentle folds from bottom to top. This ensures any settled ingredients get incorporated.
Scrape all the batter into your prepared pan, using your spatula to spread it evenly. The batter should reach all edges uniformly for consistent baking.
Step 7: Initial Baking
Place your pan in the preheated oven and bake for exactly 10 minutes. The edges should just start setting while the center remains slightly jiggly.
Remove the pan carefully from the oven—it will be hot! Leave your oven on for the next step.
Step 8: Add the Macapuno
Distribute the macapuno evenly over your partially-baked cake. Spread it gently with a spoon, covering the entire surface but avoiding pressing it down into the batter.
This timing allows the macapuno to sink slightly into the cake while still maintaining distinct texture. It’s the perfect moment for adding your special touch.
Step 9: Finish Baking
Return your pan to the oven immediately and bake for an additional 12 minutes. The cake should puff up beautifully and edges will turn lightly golden brown.
Test doneness by inserting a toothpick into the center—it should come out with just a few moist crumbs. You don’t want it completely dry.
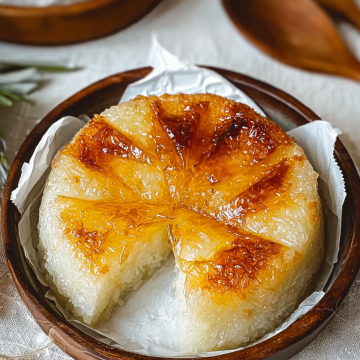
Step 10: Broil for Golden Perfection
Switch your oven setting to broil (high heat from above). Brush the cake top with your remaining melted butter and sprinkle generously with sugar.
Broil for approximately 2 minutes, watching constantly through the oven window. The top should become golden brown and the macapuno will caramelize slightly, creating a beautiful finish.
Pro tip: Position your oven rack about 6 inches from the broiler element for optimal results. Too close will burn the top before caramelizing properly.
Step 11: Cool and Serve
Transfer your pan to a wire cooling rack and let it rest for 10 minutes. This cooling time allows the structure to set while keeping the cake warm.
Run a butter knife gently around the pan edges to loosen the cake. Invert carefully onto your wire rack, then flip right-side up onto a serving platter.
Peel away the banana leaves (or parchment paper) carefully—they should release easily if properly buttered. Serve your bibingka warm for the absolute best flavor experience.
Helpful Tricks for Perfect Bibingka
Measure flour correctly: Spoon rice flour into your measuring cup and level off with a knife. Scooping directly packs flour and creates dense results instead of fluffy cake.
Use quality macapuno: Fresh macapuno from Asian markets delivers superior flavor and texture. Jarred macapuno works well too but drain excess syrup before using.
Room temperature ingredients: Let your egg and coconut milk sit at room temperature for 30 minutes before starting. This helps everything blend smoothly together.
Watch the broiler closely: Broiling happens fast—seriously, don’t walk away! Two minutes can quickly become burnt if you’re not paying attention to your cake.
Fresh baking powder matters: Old baking powder won’t provide proper lift. Test yours by mixing 1/2 teaspoon with hot water—it should bubble vigorously immediately.
Don’t skip the butter brushing: That final butter brush before broiling creates irresistible richness and helps sugar caramelize perfectly. It’s worth every calorie.
Banana leaf preparation: If your banana leaves crack when heating, they’re too dry. Wipe them with damp cloth first, then heat them more gently.
VARIATIONS, PAIRINGS & FAQ
Make Ahead Options
Planning ahead? This bibingka adapts beautifully to your schedule. Prepare the batter up to 24 hours in advance and store it covered tightly in your refrigerator.
When ready to bake, let the cold batter sit at room temperature for 10 minutes. Then proceed with the recipe exactly as written for perfect results.
Already baked your bibingka? Store the cooled cake in an airtight container at room temperature for up to 3 days. The flavors actually develop and deepen over time.
To reheat, warm individual slices in a 350°F (175°C) oven for 8-10 minutes. They’ll taste freshly baked with that wonderful warm, soft texture restored.
You can also freeze individual wrapped slices for up to 2 months. Thaw overnight in the refrigerator, then warm before serving for best results.
Bibingka Variations & Substitutions
Ube bibingka: Fold 2 tablespoons of ube halaya (purple yam jam) into your batter before baking. This creates stunning purple swirls and authentic Filipino flavor.
Cheese topping: Traditional bibingka often features salted egg and cheese. Top your cake with strips of salted duck egg and grated queso de bola before final broiling.
Pandan flavor: Add 1 teaspoon pandan extract to your wet ingredients for that distinctive Asian flavor. The green color and unique taste transform this into something special.
Dairy-free version: Replace butter with coconut oil (same amount) for completely dairy-free bibingka. The extra coconut flavor intensifies beautifully with this substitution.
Different sweeteners: Swap granulated sugar for coconut sugar to add caramel notes. Use the exact same measurement for consistent texture and sweetness level.
Extra coconut: Fold 1/4 cup shredded coconut into your batter along with macapuno. This amplifies the coconut flavor and adds delightful texture throughout.
Nutty addition: Sprinkle 2 tablespoons chopped cashews or peanuts over the macapuno layer. They’ll toast during broiling and add wonderful crunch.
Citrus twist: Add 1 teaspoon finely grated lime zest to your batter for bright, fresh flavor. The citrus cuts through richness and awakens your palate beautifully.
What to Serve with Bibingka
Hot Filipino chocolate (sikwate): This thick, rich drinking chocolate made from cacao tablets complements bibingka perfectly. The bittersweet chocolate balances the cake’s sweetness beautifully.
Fresh tropical fruit: Sliced mango, pineapple chunks, or ripe papaya provide refreshing contrast. The bright acidity cuts through the rich coconut and cleanses your palate.
Coconut ice cream: Creamy coconut ice cream melting over warm bibingka creates an incredible temperature and texture contrast. It’s pure indulgence in every spoonful.
Strong brewed coffee: Bold coffee cuts through sweetness while complementing the coconut notes perfectly. Filipino barako coffee would be traditionally authentic if you can find it.
Sweetened condensed milk drizzle: A light drizzle adds extra sweetness and creamy richness. This is common in Filipino dessert preparations and tastes absolutely divine.
Salted butter: Simply spreading soft salted butter on warm bibingka creates delicious sweet-savory balance. The salt enhances every other flavor present.
Whipped cream: Light, airy whipped cream adds luxurious texture without heaviness. Vanilla-scented whipped cream works especially well with coconut flavors.
Ginger tea: Warm ginger tea with honey provides soothing, spicy notes that complement rather than compete. The ginger’s warmth enhances the coconut beautifully.
How to Store and Freeze Bibingka
Room temperature storage: Keep your bibingka in an airtight container at room temperature for up to 3 days. Make sure the container seals tightly to prevent drying.
Refrigerator storage: Refrigerate in an airtight container for up to 5 days when extended storage is needed. Bring to room temperature or reheat before serving.
Freezing instructions: Wrap individual slices tightly in plastic wrap, then place in a freezer-safe bag. Properly wrapped bibingka freezes beautifully for up to 2 months.
Thawing method: Remove frozen slices from freezer and thaw at room temperature for 2 hours. For faster thawing, microwave on defrost setting for 30-second intervals.
Reheating for best results: Warm thawed slices in a 350°F (175°C) oven for 8-10 minutes. This restores the cake’s soft texture and brings back that fresh-baked quality.
Maintaining moisture: Place a small piece of bread in your storage container with the bibingka. The bread will absorb excess moisture and keep your cake perfectly textured.
Frequently Asked Questions
Can I use regular all-purpose flour instead of rice flour?
I don’t recommend this substitution because rice flour creates bibingka’s distinctive texture. All-purpose flour will make regular cake, losing the authentic chewy-light quality that makes bibingka special. If you absolutely must substitute, the flavor will still be good but texture will differ significantly.
Where can I find macapuno if my local stores don’t carry it?
Look for jarred macapuno in the Asian foods aisle or at Filipino grocery stores. Online retailers like Amazon carry multiple brands. In a pinch, substitute sweetened shredded coconut mixed with coconut gel, though texture won’t be identical to authentic macapuno.
My bibingka turned out dense instead of fluffy—what went wrong?
Dense bibingka usually results from old baking powder or overmeasured flour. Test your baking powder freshness and measure flour by spooning into cups rather than scooping. Also ensure your oven temperature is accurate—too low heat prevents proper rising.
Can I make bibingka without banana leaves?
Absolutely! Banana leaves add aromatic flavor and beautiful presentation but aren’t essential. Simply grease your pan well and line with parchment paper. The taste remains delicious even without the subtle banana leaf fragrance.
How do I know when my bibingka is perfectly done?
Your bibingka is ready when edges are lightly golden, the center is puffed, and a toothpick comes out with moist crumbs. The top should spring back when lightly touched. Overbaking creates dry texture, so pull it when slightly underdone—it continues cooking while cooling.
Enjoy your homemade Irresistible Bibingka Filipino Rice Cake! This recipe brings authentic Filipino flavors to your kitchen with minimal effort and maximum deliciousness.
Irresistible Bibingka Filipino Rice Cake
Instructions
- Prepare Oven and Pan:
- Position oven rack in middle and preheat to 375°F (190°C).
- If using banana leaves, rinse and pat dry. Hold over medium-high gas flame for 15 seconds per side until soft and pliable.
- Line 8-inch round pan with banana leaves, overlapping slightly. Brush with 1/2 oz melted butter. (Alternative: grease pan and line bottom with parchment paper)
- Mix Ingredients:
- In a medium bowl, whisk together white rice flour, sweet rice flour, baking powder, and salt for 30 seconds.
- In a large bowl, whisk together 1 oz melted butter, sugar, coconut milk, and egg for 1 minute until sugar dissolves and mixture is smooth.
- Add dry ingredients to wet ingredients. Whisk for 45 seconds until smooth and lump-free.
- Bake:
- Fold batter gently once or twice with spatula. Pour into prepared pan and spread evenly.
- Bake for 10 minutes until edges start setting and center is slightly jiggly.
- Remove from oven. Distribute macapuno evenly over partially-baked cake.
- Return to oven and bake for additional 12 minutes until puffed and edges are lightly golden. Test with toothpick—should come out with moist crumbs.
- Finish:
- Switch oven to broil. Brush cake top with remaining melted butter and sprinkle generously with sugar.
- Broil for 2 minutes, watching constantly, until top is golden brown and macapuno caramelizes slightly. Position rack 6 inches from broiler element.
- Transfer to wire rack and cool for 10 minutes. Run knife around edges, invert onto rack, then flip right-side up onto serving platter.
- Peel away banana leaves or parchment. Serve warm.
Notes
Use fresh baking powder. Test by mixing 1/2 teaspoon with hot water; it should bubble vigorously.
Room temperature egg and coconut milk blend more smoothly. Let sit 30 minutes before starting.
Drain excess syrup from jarred macapuno before using. Storage: Room temperature: Store in airtight container up to 3 days
Refrigerator: Up to 5 days in airtight container
Freezer: Wrap individual slices in plastic wrap, freeze up to 2 months Reheating: Oven method: Warm at 350°F (175°C) for 8-10 minutes
Microwave: Defrost setting, 30-second intervals Substitutions: No banana leaves: Use buttered pan with parchment paper
Dairy-free: Replace butter with coconut oil
No macapuno: Use sweetened shredded coconut mixed with coconut gel Watch the Broiler: Broiling happens quickly—don’t walk away! Two minutes can turn to burnt if unattended.Claude is AI and can make mistakes. Please double-check responses.