
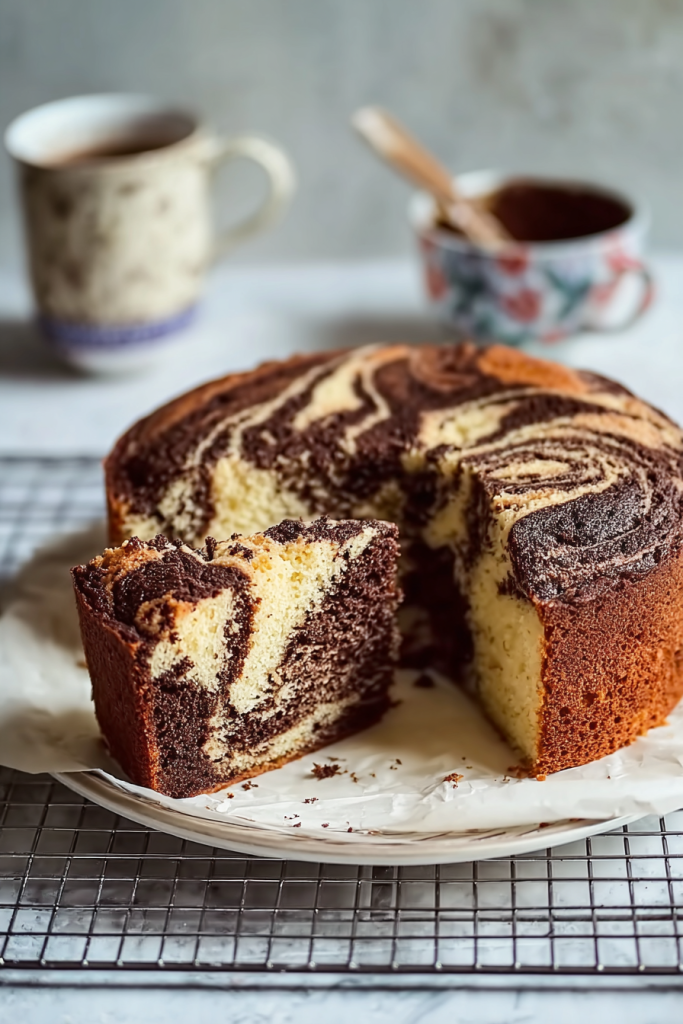
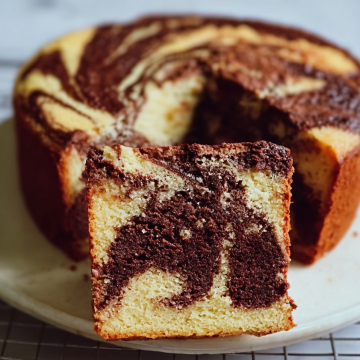
Marble Cake Recipe lovers will adore this classic dessert that blends rich chocolate with soft vanilla for a perfectly moist and beautiful swirl every time. I’ve been making this cake for years, and it never fails to impress. The stunning pattern of vanilla and chocolate creates a showstopping look and an even better taste.

Why You’ll Love This Marble Cake
I absolutely love how this recipe delivers two flavors in every bite. The vanilla batter provides a light, sweet base while the chocolate adds richness. You don’t need fancy techniques or unusual ingredients to achieve professional-looking results.
The texture comes out perfectly moist every single time I bake it. The crumb is tender without being too dense or crumbly. I appreciate that this cake doesn’t require frosting, though you can certainly add some if you prefer.
This recipe works beautifully for both casual family desserts and special celebrations. I’ve served it at birthday parties, potlucks, and afternoon tea gatherings. Everyone always asks for the recipe, which tells me it’s a true crowd-pleaser.
Beginners find this cake approachable while experienced bakers appreciate its reliability. The mixing method is straightforward and forgiving. You’ll feel confident making this whether it’s your first cake or your hundredth.
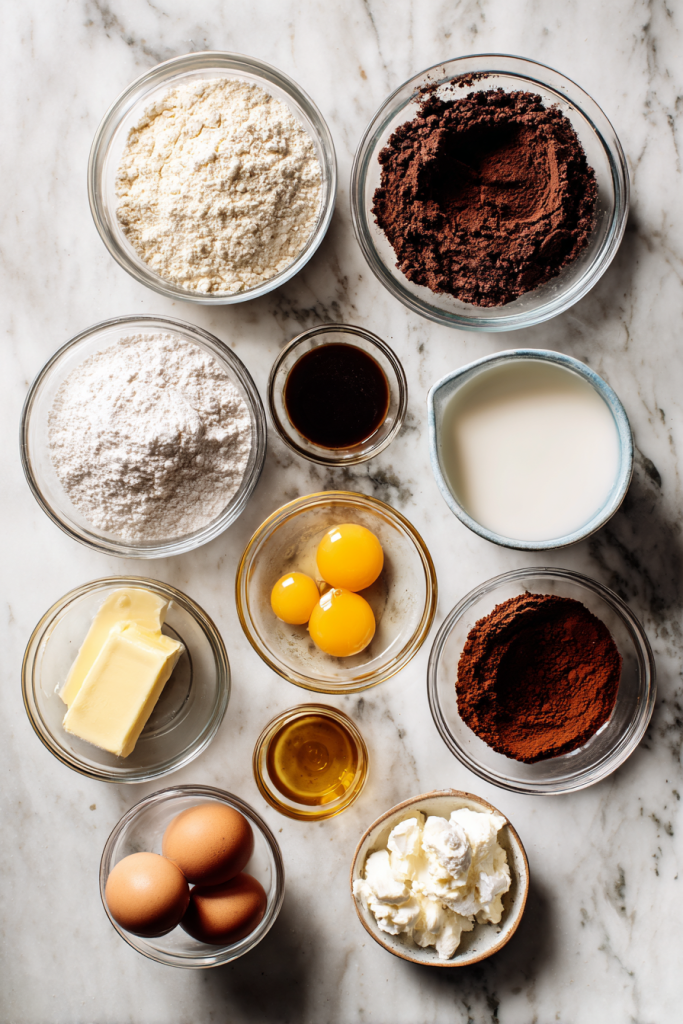
Ingredients Overview
| Ingredient | Quantity | Notes |
|---|---|---|
| All-purpose flour | 2 cups | Spoon into cup and level off |
| White sugar | 1 cup | Granulated white sugar |
| Milk | 1 cup | Whole or 2% milk works best |
| Large eggs | 2 | Room temperature preferred |
| Butter, softened | ½ cup | Not melted, just soft |
| Baking powder | 2 teaspoons | Check freshness date |
| Vanilla extract | 1 teaspoon | Pure extract recommended |
| Salt | ½ teaspoon | Balances sweetness |
| Unsweetened cocoa powder | 2 tablespoons | Natural cocoa powder |
Prep Time: 20 minutes | Cook Time: 30-35 minutes | Total Time: 50-55 minutes
Servings: 10 slices | Difficulty: Easy
I’ll walk you through each ingredient and explain why it matters. All-purpose flour creates the structure that holds this cake together. I always measure by spooning flour into the cup rather than scooping directly. This prevents packing too much flour, which leads to dry, dense results.
White sugar does more than just sweeten the batter. It helps create that fine, tender crumb I love in this cake. The sugar also contributes to the golden color of the vanilla portion.
Milk adds essential moisture and creates tenderness throughout the cake. I use whole milk for the richest flavor, but 2% works perfectly fine too. The liquid helps blend all ingredients into a smooth batter.
Eggs serve multiple purposes in this recipe. They provide structure, add moisture, and bind everything together beautifully. I recommend using room temperature eggs because they incorporate more easily into the batter.
Butter brings incredible flavor and creates that melt-in-your-mouth texture. Make sure your butter is properly softened but not melted. I leave mine on the counter for about an hour before starting.
Baking powder acts as our leavening agent. It creates air bubbles that make the cake rise properly during baking. Always check the expiration date because old baking powder loses its effectiveness.
Vanilla extract infuses the entire cake with warm, aromatic flavor. I prefer pure vanilla extract over imitation because the flavor is noticeably better. This forms the foundation of the vanilla batter’s taste.
Salt might seem like a minor ingredient, but don’t skip it. It enhances all the other flavors and balances the sweetness perfectly. Even this small amount makes a significant difference.
Unsweetened cocoa powder transforms part of the batter into rich chocolate. I use natural cocoa powder rather than Dutch-processed for this recipe. Just two tablespoons create that beautiful marble effect we’re after.
Step-by-Step Directions
Step 1: Prepare Your Oven and Pan
I start by preheating my oven to 350 degrees F (175 degrees C). This ensures the oven reaches the right temperature before the cake goes in. Meanwhile, I grease and flour a 9-inch round pan thoroughly to prevent sticking.
Step 2: Combine the Main Ingredients
I place the flour, sugar, milk, eggs, butter, baking powder, vanilla, and salt into a large mixing bowl. Having everything in one bowl makes this process incredibly simple. I use a bowl that’s large enough to mix comfortably without spilling.
Step 3: Mix the Batter
First, I mix the ingredients slowly just to moisten everything together. Then I switch to an electric mixer at medium speed and beat for about 2 minutes. The batter should look smooth and well-combined when it’s ready.
Step 4: Divide the Batter
I measure out ¾ cup of batter and set it aside in a small bowl. This portion will become the chocolate swirl. The remaining batter gets poured into my prepared pan right away.
Step 5: Create the Chocolate Batter
I add the cocoa powder to the reserved ¾ cup of batter and stir thoroughly. I keep mixing until the color is completely even with no white streaks remaining. The chocolate batter should be slightly thicker than the vanilla portion.
Step 6: Create the Marble Effect
Using a large spoon, I drop the chocolate batter in several dollops across the vanilla batter in the pan. I space them out rather than putting them all in one spot. Then I take a butter knife and make gentle figure-eight motions through both batters.
The key is not to overmix at this stage. I make just a few swirls to create the marble pattern. Too much mixing will blend the colors together and you’ll lose that beautiful contrast.
Step 7: Bake the Cake
I place the pan in my preheated oven and bake for 30 to 35 minutes. I start checking at 30 minutes by inserting a toothpick into the center. When it comes out clean or with just a few moist crumbs, the cake is done.
Step 8: Cool and Serve
I let the cake cool in the pan for about 10 minutes on a wire rack. Then I carefully invert it onto a serving plate or cooling rack. I allow it to cool completely before slicing, which usually takes 1-2 hours.
Servings and Timing Details
This recipe makes one 9-inch round cake that serves approximately 10 people. I find the portions are generous enough for dessert after a meal. The preparation takes about 20 minutes from start to finish. Baking requires 30 to 35 minutes in the oven. The total active and baking time comes to roughly 50 to 55 minutes. Don’t forget to factor in cooling time, which adds another 1 to 2 hours.
Recipe Variations I Love
Chocolate Chip Marble Cake: I sometimes add ½ cup of mini chocolate chips to the vanilla batter. This creates extra chocolate flavor and adds pleasant texture throughout the cake.
Citrus Marble Cake: Adding 1 tablespoon of orange or lemon zest to the vanilla batter brings brightness. The citrus aroma fills my kitchen and complements the chocolate beautifully.
Mocha Marble: I dissolve 1 teaspoon of instant coffee in 1 tablespoon of warm water. Then I add this to the chocolate portion for a sophisticated coffee-chocolate combination.
Almond Marble Cake: Replacing vanilla extract with almond extract changes the entire flavor profile. The nutty taste pairs wonderfully with the chocolate swirl.
Bundt Cake Version: When I need an elegant presentation, I double this recipe and use a 10-inch bundt pan. The baking time increases to 50-55 minutes.
Marbled Cupcakes: I pour the batter into lined cupcake tins and swirl each one individually. These bake in just 18-20 minutes and yield about 18-20 cupcakes.
Glazed Marble Cake: Sometimes I top the cooled cake with a simple glaze. I mix 1 cup powdered sugar with 2 tablespoons milk and ½ teaspoon vanilla for a sweet finish.
Storage and Reheating Tips

Room Temperature Storage: I store the completely cooled cake in an airtight container at room temperature. It stays fresh for up to 3 days this way. I cover any cut sides with plastic wrap to prevent them from drying out.
Refrigerator Storage: When I need the cake to last longer, I refrigerate it in an airtight container. It keeps well for up to 5 days in the fridge. I always let it come to room temperature before serving for the best texture and flavor.
Freezing Instructions: This cake freezes beautifully, which I do often when making ahead. I wrap the completely cooled cake tightly in plastic wrap first. Then I add a layer of aluminum foil or place it in a freezer-safe container. It stays good in the freezer for up to 3 months. I thaw it overnight in the refrigerator or for a few hours at room temperature.
Reheating Method: While I typically serve this cake at room temperature, warming is an option. Individual slices can go in the microwave for 10-15 seconds. This brings back that wonderful fresh-baked quality.
Frequently Asked Questions
Why did my marble cake turn out dry?
Overbaking is the most common culprit when cakes turn out dry. I always check for doneness a few minutes before the suggested time. Also, measuring flour correctly makes a huge difference. Spoon the flour into measuring cups rather than scooping directly from the bag, which packs too much flour.
How do I create the perfect marble effect?
The secret is not overmixing the batters when swirling them together. I use a knife or skewer and make just a few figure-eight motions. Too much swirling blends the colors together and you lose that distinct pattern.
Can I use cake flour instead of all-purpose flour?
Yes, you can substitute cake flour for an even lighter texture. Use 2 ¼ cups of cake flour instead of 2 cups all-purpose flour. Cake flour weighs less by volume, so you need slightly more.
My cake sank in the middle. What went wrong?
A sunken center usually means the cake was underbaked. It can also happen if you open the oven door too early. Another possibility is too much leavening agent or expired baking powder.
Can I make this cake ahead of time?
Absolutely! I actually think this cake tastes better after sitting for a day. You can bake it 1-2 days before your event. Just store it in an airtight container at room temperature.
Is Dutch-processed cocoa powder okay to use?
Natural cocoa powder works best, but Dutch-processed will work in this recipe. The baking powder provides enough leavening regardless of which cocoa type you choose.
Why didn’t my cake rise properly?
First, check if your baking powder is fresh since it loses potency over time. Also, make sure you beat the batter sufficiently to incorporate air. However, don’t overmix after adding flour, which develops too much gluten.
Can I add frosting to this marble cake?
Definitely! While delicious plain, this cake pairs wonderfully with frostings. Try chocolate ganache, vanilla buttercream, or cream cheese frosting for special occasions.
Final Thoughts
This classic marble cake has become one of my most-requested recipes. The beautiful swirls create an impressive presentation that looks far more complicated than it actually is. The combination of vanilla and chocolate satisfies everyone’s preferences.
I love how straightforward the preparation is compared to the elegant results. Whether you’re baking for family, friends, or a special celebration, this versatile cake delivers every time. The moist, tender crumb and balanced flavors make it perfect for any occasion.
Give this timeless recipe a try in your own kitchen. I’m confident it will become one of your favorites too. The reliable results and simple technique make it ideal for both beginners and experienced bakers alike.
Classic Marble Cake Recipe
Ingredients
- 2 cups all-purpose flour spoon and level
- 1 cup granulated white sugar
- 1 cup milk whole or 2%
- 2 large eggs room temperature
- ½ cup butter softened (not melted)
- 2 teaspoons baking powder
- 1 teaspoon pure vanilla extract
- ½ teaspoon salt
- 2 tablespoons unsweetened cocoa powder natural type
Instructions
- Preheat oven: Set oven to 350°F (175°C). Grease and flour a 9-inch round pan.
- Combine ingredients: In a large bowl, add flour, sugar, milk, eggs, butter, baking powder, vanilla, and salt.
- Mix batter: Beat slowly until combined, then mix on medium speed for 2 minutes until smooth.
- Separate batter: Transfer ¾ cup of the batter to a small bowl for the chocolate portion.
- Make chocolate batter: Stir cocoa powder into the reserved batter until evenly mixed.
- Create marble effect: Pour vanilla batter into the prepared pan. Add dollops of chocolate batter, then swirl lightly with a knife in figure-eight motions.
- Bake: Bake for 30–35 minutes or until a toothpick inserted in the center comes out clean.
- Cool and serve: Cool in pan for 10 minutes, then transfer to a rack. Let cool completely before slicing.