
Caramelitas recipe – have you discovered these gooey, indulgent bars yet? There’s something magical about the combination of buttery oats, rich caramel, and melted chocolate chips. When these flavors unite in perfect harmony, they create what I call the ultimate comfort dessert – Caramelitas. These gooey, indulgent bars have become my go-to treat whenever I need something that tastes like a warm hug.

My love affair with Caramelitas began during a particularly stressful week last fall. I was juggling work deadlines and family responsibilities when my neighbor knocked on my door. She handed me a plate of these incredible bars, still warm from her oven. The moment I bit into that perfect combination of chewy oats and gooey caramel, I knew I had to learn her secret.
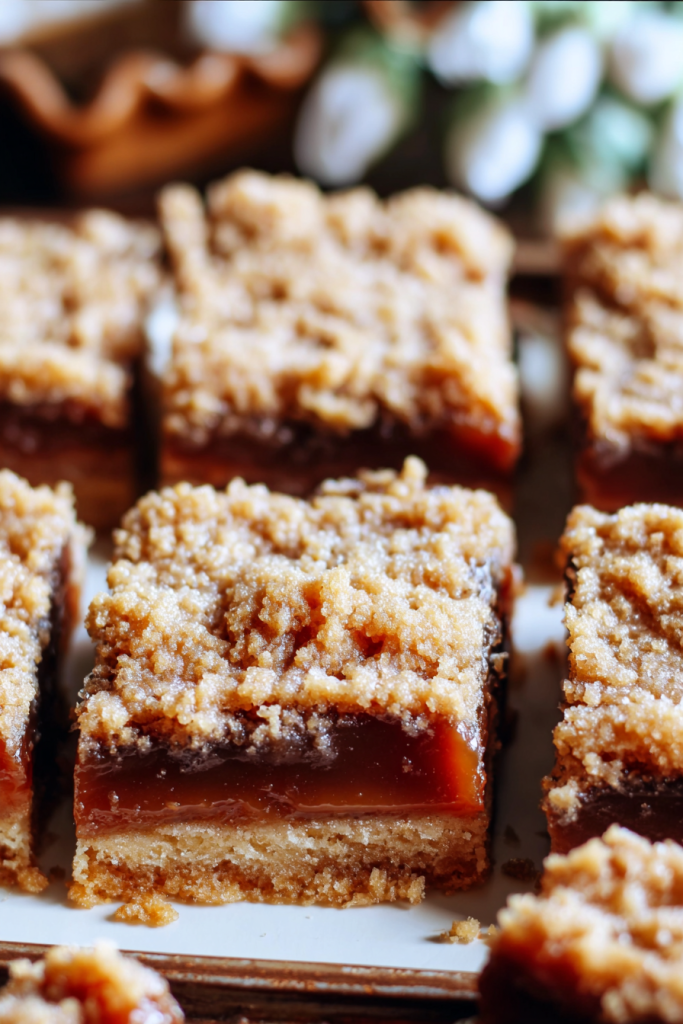
What makes these bars truly special is their three-layer construction. The bottom layer provides a sturdy, cookie-like foundation made from rolled oats and brown sugar. The middle layer features a luscious caramel sauce that seeps into every crevice. Finally, the top layer adds texture and visual appeal with its golden-brown finish.
The beauty of this Caramelitas recipe lies in its simplicity. You don’t need fancy equipment or hard-to-find ingredients. Most items are probably sitting in your pantry right now. The process takes about 35 minutes from start to finish, though the hardest part is waiting for them to cool completely before cutting.
I’ve made these bars countless times for potluck dinners, bake sales, and family gatherings. They disappear faster than any other dessert I bring. Friends constantly ask for the recipe, and now I’m sharing it with you. The key is using quality ingredients and not rushing the cooling process.
Recipe Timing:
- Prep Time: 10 minutes
- Cook Time: 30 minutes
- Total Time: 40 minutes
- Servings: 16 bars
- Difficulty: Easy
These Caramelitas strike the perfect balance between sweet and salty. The brown sugar adds depth while the oats provide satisfying texture. Every bite delivers that perfect combination of chewy and crunchy that makes dessert lovers swoon.
Whether you’re hosting a dinner party or simply treating yourself, these bars deliver restaurant-quality results with minimal effort. They store well for up to a week, though I guarantee they won’t last that long once people discover them.
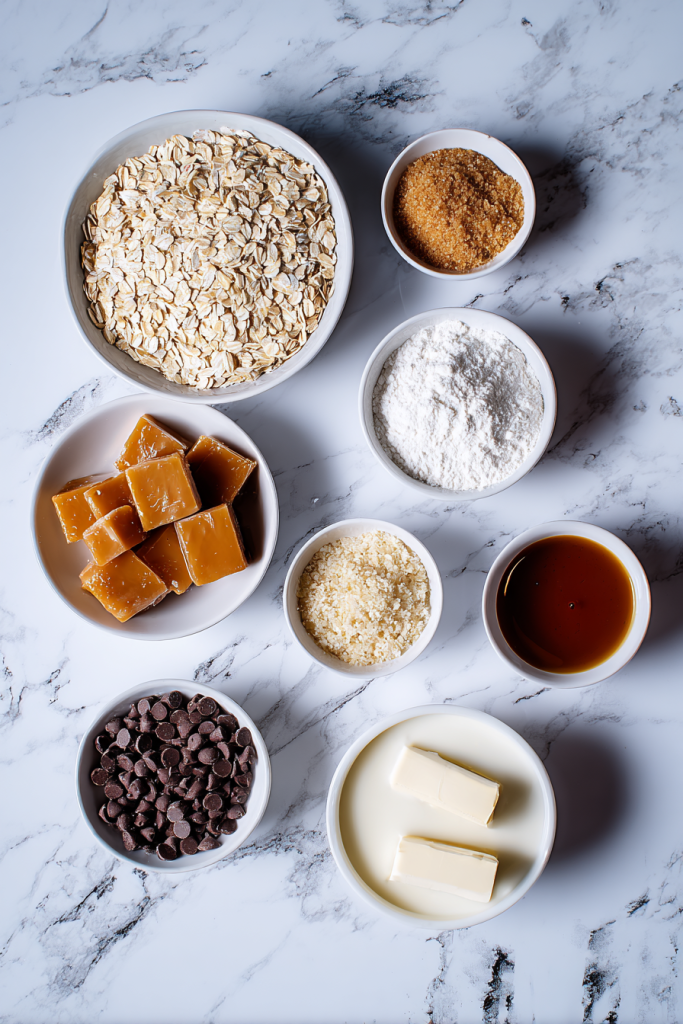
Ingredients & Instructions
Ingredients Table
| Ingredient | Quantity | Notes |
|---|---|---|
| Rolled oats | 1 cup | Old-fashioned oats work best |
| Melted butter | ¾ cup | Use unsalted, cooled slightly |
| All-purpose flour | 1 cup | Sifted for best texture |
| Brown sugar | ¾ cup | Packed firmly for measurement |
| Baking soda | 1 teaspoon | Fresh for proper leavening |
| Soft caramels | 11 oz bag | Unwrapped before starting |
| Chocolate chips | 1 cup | Semi-sweet or milk chocolate |
| Heavy cream | ½ cup | Room temperature preferred |
Step-by-Step Instructions
Preparation Phase: Start by preheating your oven to 350°F (175°C). This temperature ensures even baking without burning the delicate oat mixture. Grease an 8×8 inch baking pan thoroughly. I prefer using butter for greasing since it adds extra flavor to the crust.
Creating the Caramel Layer: In a medium saucepan, combine the unwrapped soft caramels with heavy cream. Cook over medium heat, stirring constantly with a wooden spoon. The mixture will look lumpy at first, but patience is key. Continue stirring for 3-5 minutes until the caramels completely melt and create a smooth, golden sauce. Remove from heat and set aside to cool slightly.
Pro tip: If your caramel seems too thick, add an extra tablespoon of heavy cream. The consistency should be pourable but not runny.
Mixing the Oat Base: In a large mixing bowl, combine melted butter and brown sugar. Stir until well blended and no sugar lumps remain. The mixture should be smooth and glossy. Add the flour, rolled oats, and baking soda. Mix until everything is evenly distributed and the mixture resembles coarse crumbs.
Assembly Process: Take half of your oat mixture and press it firmly into the bottom of your prepared baking pan. Use the back of a measuring cup to create an even, compact layer. This foundation needs to be solid to support the caramel and chocolate layers above.
Bake this crust for exactly 10 minutes. The edges should be lightly golden but not brown. Remove from the oven and immediately sprinkle chocolate chips evenly across the surface. The hot crust will begin melting the chocolate slightly, which helps everything bind together.

Final Assembly: Pour the warm caramel mixture over the chocolate chips. Use a spoon to spread it evenly, ensuring it reaches all corners. The caramel will seep between the chocolate chips, creating pockets of gooey goodness.
Crumble the remaining oat mixture over the caramel layer. Don’t pack it down – just distribute it evenly. Some caramel should peek through, which creates an attractive rustic appearance.
Baking the Complete Bars: Return the pan to the oven and bake for 20-22 minutes. The top should be golden brown and set to the touch. Don’t overbake, as the caramel can become too firm.
Cooling Process: This step requires patience but is absolutely crucial. Allow the bars to cool completely in the pan for at least 2 hours. The caramel needs time to set properly. For clean cuts, refrigerate for 30 minutes before slicing.
Use a sharp knife wiped clean between cuts. This prevents the caramel from dragging and ensures neat squares. Each bar should have distinct layers visible from the side.
Tips, Storage & FAQ
Expert Tips for Perfect Caramelitas
Temperature Control: The most common mistake I see people make is rushing the cooling process. These bars need time for the caramel to set properly. Room temperature cooling followed by brief refrigeration creates the ideal texture. If you cut them too early, the caramel will be too soft and the bars will fall apart.
Ingredient Substitutions: While I recommend sticking to the original recipe, there are some acceptable variations. You can substitute the chocolate chips with butterscotch chips or chopped walnuts for different flavor profiles. Quick-cooking oats work in a pinch, but old-fashioned oats provide better texture and appearance.
Storage Solutions: Store finished Caramelitas in an airtight container at room temperature for up to one week. For longer storage, wrap individual bars in plastic wrap and freeze for up to three months. They thaw beautifully and taste just as good as fresh-baked.
Serving Suggestions: These bars are delicious on their own, but try serving them warm with vanilla ice cream for an extra special treat. A light dusting of sea salt on top enhances the caramel flavor and adds gourmet appeal.
Frequently Asked Questions
Q: Can I use homemade caramel instead of store-bought caramels? A: Absolutely! Homemade caramel works wonderfully. You’ll need about 1 cup of prepared caramel sauce. Just ensure it’s the right consistency – pourable but not too thin.
Q: Why are my bars falling apart when I cut them? A: This usually happens when the bars haven’t cooled completely. The caramel needs at least 2 hours to set properly. Also, make sure you’re using a sharp knife and wiping it clean between cuts.
Q: Can I double this recipe for a larger pan? A: Yes! Double all ingredients and use a 9×13 inch pan. Increase the baking time by 5-7 minutes for both the initial crust and final baking. The bars will be slightly thinner but just as delicious.
Q: What’s the best way to unwrap all those caramels quickly? A: Place the caramels in the freezer for 15 minutes before unwrapping. The cold makes the wrappers easier to remove. Alternatively, enlist family members – many hands make light work!
Q: Can I make these bars gluten-free? A: Yes! Substitute the all-purpose flour with a 1:1 gluten-free flour blend. The texture will be slightly different but still delicious. Make sure your oats are certified gluten-free as well.
Final Thoughts: Caramelitas represent everything I love about homemade desserts. They’re approachable enough for beginning bakers yet sophisticated enough to impress guests. The combination of textures and flavors creates a memorable treat that brings people together. Whether you’re making them for a special occasion or just because, these bars never fail to deliver smiles and satisfaction.
Give this recipe a try, and I guarantee you’ll understand why Caramelitas have become such a beloved treat in my kitchen.
Ultimate Caramelitas Recipe
Ingredients
- 1 cup rolled oats old-fashioned oats work best
- ¾ cup melted butter unsalted, cooled slightly
- 1 cup all-purpose flour sifted for best texture
- ¾ cup brown sugar packed firmly for measurement
- 1 teaspoon baking soda fresh for proper leavening
- 11 oz bag soft caramels unwrapped before starting
- 1 cup chocolate chips semi-sweet or milk chocolate
- ½ cup heavy cream room temperature preferred
Instructions
- Preheat oven to 350°F (175°C). Grease an 8×8 inch baking pan thoroughly.
- In a medium saucepan, combine unwrapped caramels with heavy cream. Cook over medium heat, stirring constantly for 3-5 minutes until smooth. Set aside to cool slightly.
- In a large bowl, combine melted butter and brown sugar until well blended. Add flour, oats, and baking soda. Mix until mixture resembles coarse crumbs.
- Press half the oat mixture firmly into prepared pan. Bake for 10 minutes until edges are lightly golden.
- Remove from oven and immediately sprinkle chocolate chips evenly over hot crust.
- Pour warm caramel mixture over chocolate chips, spreading to all corners.
- Crumble remaining oat mixture over caramel layer without packing down.
- Bake 20-22 minutes until top is golden brown. Cool completely for 2 hours before cutting.
- For clean cuts, refrigerate 30 minutes before slicing with a sharp knife.
Notes
Store in airtight container at room temperature up to 1 week
Can substitute chocolate chips with butterscotch chips or chopped nuts
For gluten-free version, use 1:1 gluten-free flour blend and certified gluten-free oats
If caramel seems thick, add extra tablespoon of heavy cream