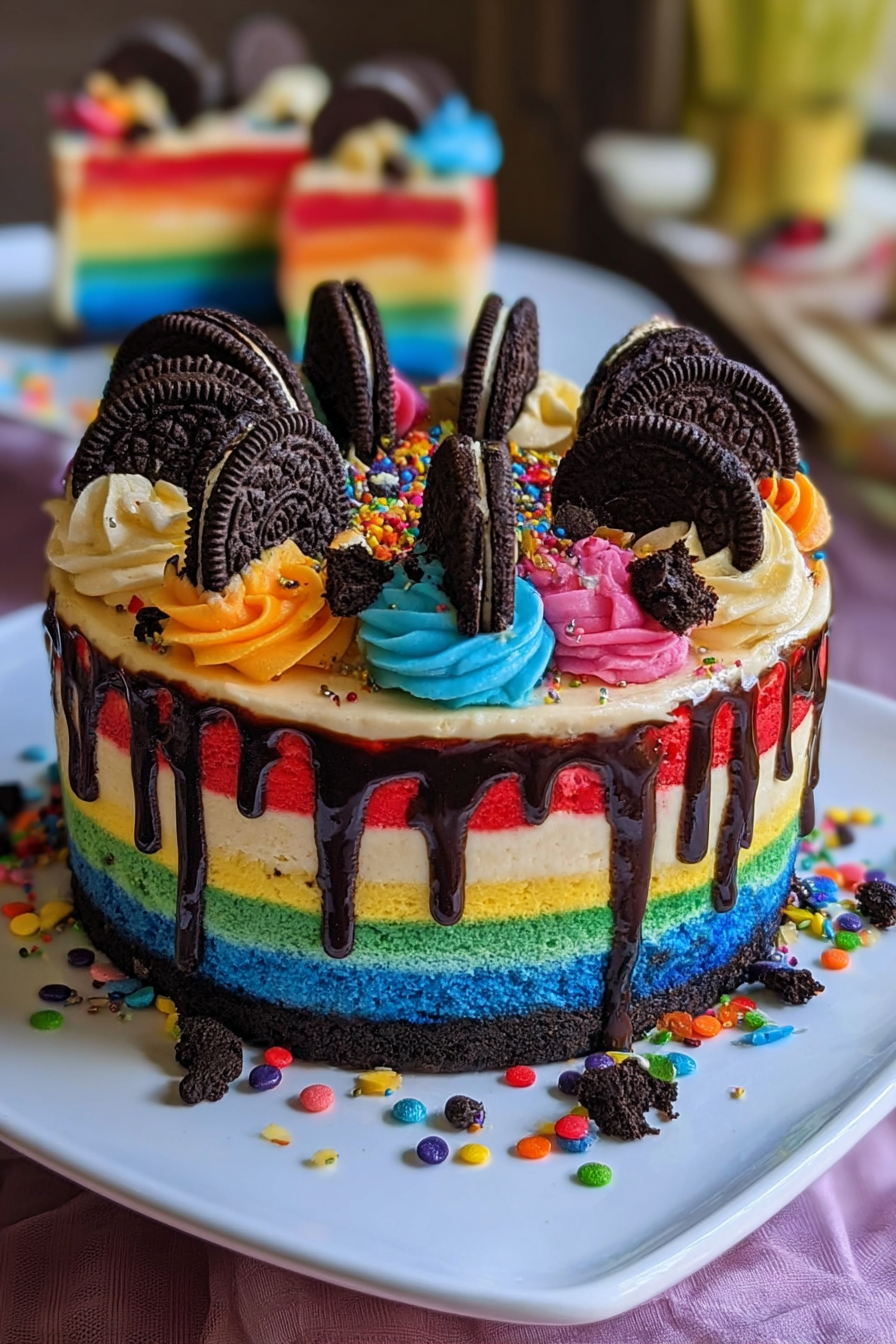
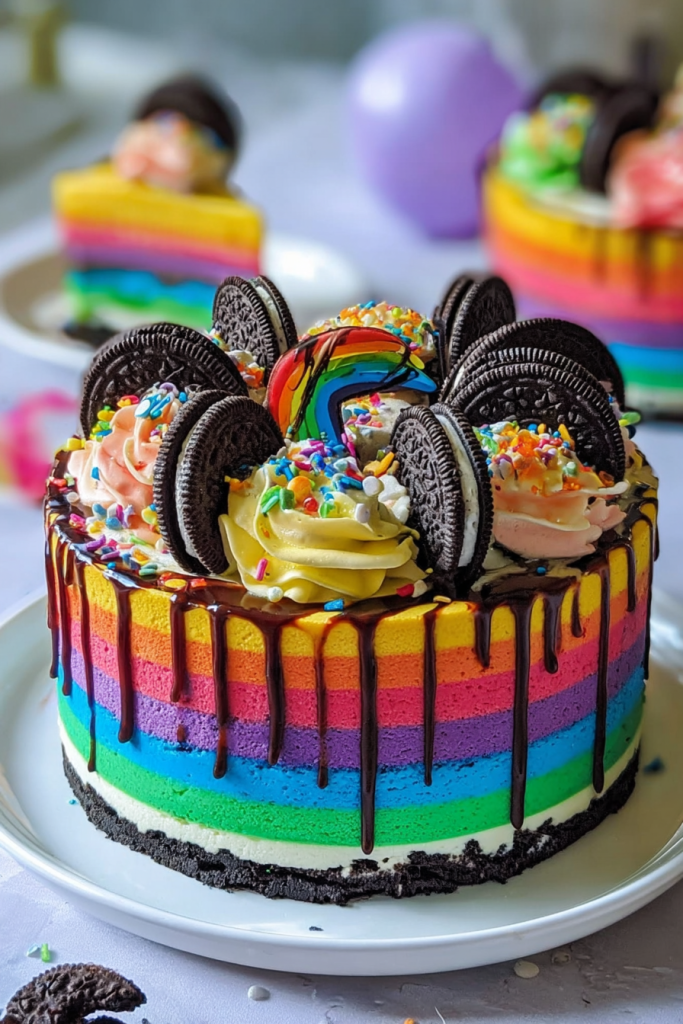
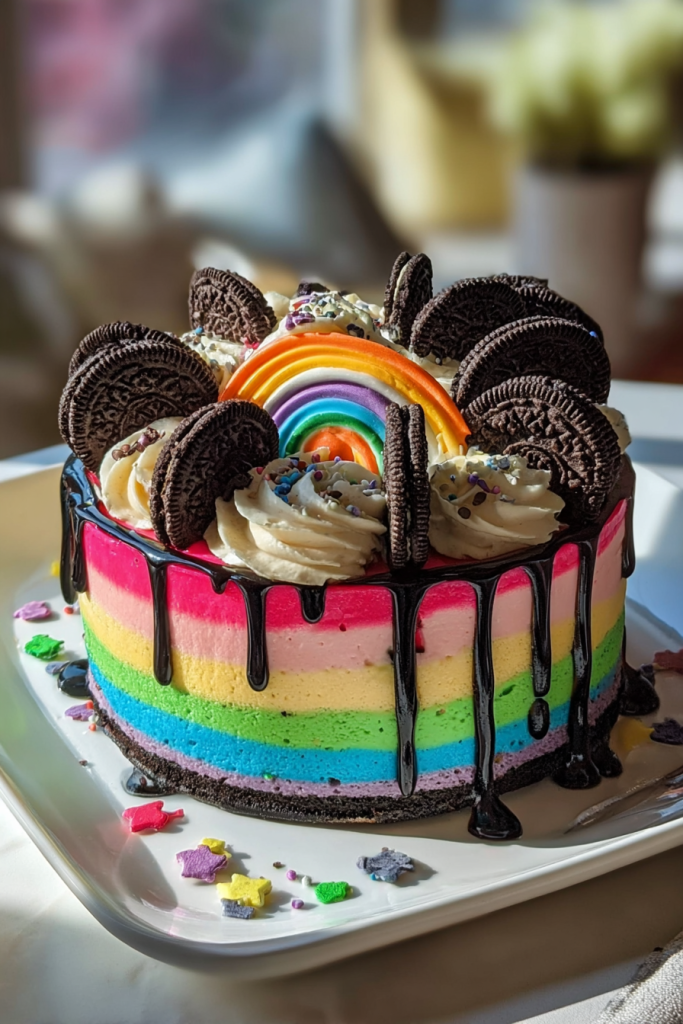
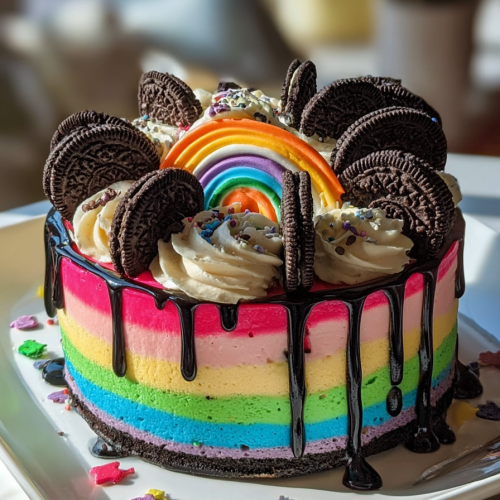
When my seven-year-old niece requested a “rainbow cake that tastes like Oreos” for her birthday last spring, I initially panicked. How do you combine the sophisticated elegance of cheesecake with the playful vibrancy of rainbow layers and the beloved crunch of America’s favorite cookie? After three weeks of kitchen experimentation and one very patient family as taste-testers, I discovered the secret: this isn’t just a rainbow Oreo cheesecake drip cake—it’s an architectural marvel that delivers on both visual impact and flavor complexity.
My journey with no-bake cheesecakes began fifteen years ago when my grandmother shared her Depression-era technique of achieving silky texture without eggs or baking. She taught me that the key to professional-quality cheesecake lies in the temperature of your ingredients and the patience to let flavors meld properly. This rainbow variation builds on her foundation while incorporating modern techniques I’ve refined through my years of pastry experimentation. The magic happens when you understand that each colored layer needs slightly different consistency to create those stunning swirled patterns without muddying the rainbow effect.
What sets my approach apart from typical rainbow desserts is the strategic layering technique that prevents color bleeding while maintaining distinct flavor profiles in each layer. By adjusting the cream ratios and chilling times between layers, we achieve vibrant color separation that photographs beautifully and tastes even better. The Oreo component isn’t just mixed in randomly—the crust provides textural contrast while crushed cookies throughout each layer add consistent flavor bursts.
From a nutritional standpoint, this dessert delivers surprising benefits beyond pure indulgence. Each slice provides approximately 12 grams of protein from the cream cheese base, while the heavy cream contributes essential fatty acids that aid in vitamin absorption. The natural vanilla extract contains antioxidants, and believe it or not, the cocoa in Oreos provides flavonoids similar to dark chocolate. At roughly 380 calories per generous slice, it’s actually more reasonable than many restaurant desserts.
This recipe sits perfectly in the intermediate skill range—accessible for confident home bakers but impressive enough for special occasions. The no-bake nature eliminates common cheesecake pitfalls like cracking or overbaking, while the drip technique teaches fundamental ganache skills. I recommend this for birthday celebrations, graduation parties, or any time you want to create an Instagram-worthy centerpiece that doubles as a conversation starter. The spring and summer seasons are ideal, as the bright colors complement outdoor gatherings and the no-bake preparation won’t heat up your kitchen.
| Ingredient | Quantity | Notes | Substitutions | Where to Buy |
|---|---|---|---|---|
| Crushed Oreos | 1 1/2 cups | Use regular Oreos, not Double Stuf | Chocolate graham crackers, chocolate wafer cookies | Any grocery store, bulk at Costco |
| Unsalted butter | 1/2 cup, melted | Must be unsalted for flavor control | Coconut oil (solid, not melted), vegan butter | Grocery dairy section |
| Cream cheese | 2 cups, softened | Philadelphia brand preferred, room temp 2 hours | Neufchâtel (lighter), Greek cream cheese | Refrigerated dairy section |
| Granulated sugar | 1 cup | Fine granulation dissolves better | Superfine sugar, coconut sugar (reduce by 1/4) | Baking aisle |
| Vanilla extract | 1 teaspoon | Pure extract, not imitation | Vanilla bean paste, almond extract (use 1/2 tsp) | Baking aisle |
| Heavy cream | 2 cups | 35-40% fat content essential | Heavy whipping cream, double cream | Dairy section, refrigerated |
| Powdered sugar | 1/4 cup | Also called confectioner’s sugar | Granulated sugar blended until fine | Baking aisle |
| Milk | 1/4 cup | Whole milk for richness | Half-and-half, evaporated milk | Dairy section |
Recipe Timing:
- Prep Time: 45 minutes | Chill Time: 4 hours | Total Time: 4 hours 45 minutes
- Active Time: 45 minutes | Hands-off Time: 4 hours
- Servings: 10 generous slices | Difficulty: Intermediate
Step-by-Step Instructions with Pro Tips
Step 1: Prepare the Oreo Crust Foundation Preheat your oven to 350°F (175°C) and grease an 8-inch springform pan with butter, then line with parchment paper. Crush Oreos in a food processor until you achieve uniform crumbs—not powder, but small, consistent pieces about the size of coarse breadcrumbs. Mix with melted butter until the mixture holds together when squeezed. Press firmly into the pan bottom using a flat measuring cup for even distribution.
Pro Tip: The crust temperature is crucial. Bake for exactly 10 minutes—any longer and it becomes too hard, any less and it won’t hold together. Let it cool completely before adding filling, or the warm crust will melt your cheesecake base.
Step 2: Master the Cream Cheese Base Remove cream cheese from refrigerator 2 hours before use. Beat with an electric mixer on medium speed for 3 minutes until completely smooth—no lumps should remain. Gradually add granulated sugar, beating another 2 minutes. Add vanilla extract and mix until just combined.
Pro Tip: Room temperature cream cheese is non-negotiable. Cold cream cheese creates lumps that never fully disappear. If you forgot to soften it, cut into small cubes and microwave in 10-second intervals, stirring between each.
Step 3: Create Perfect Whipped Cream In a separate bowl, whip heavy cream and powdered sugar until stiff peaks form—about 3-4 minutes with an electric mixer. The peaks should hold their shape when you lift the beaters. Gently fold this whipped cream into the cream cheese mixture using a rubber spatula, working in one direction to maintain airiness.
Pro Tip: Overwhipped cream turns to butter, underwhipped won’t hold structure. The perfect stage is when peaks stand straight up without drooping.
Step 4: Divide and Color Like a Pro Divide your cheesecake mixture evenly into six bowls—use a kitchen scale for precision if available. Add food coloring one drop at a time, mixing thoroughly. For vibrant colors, use gel food coloring rather than liquid. Create classic rainbow order: red, orange, yellow, green, blue, purple.
Pro Tip: Start with less coloring than you think you need. Colors intensify as they sit, and you can always add more. Gel coloring won’t thin your mixture like liquid versions do.
Step 5: Layer with the Marble Technique Starting with red, dollop spoonfuls of colored batter randomly across the cooled crust. Continue with orange, then yellow, green, blue, and purple. Don’t worry about perfect placement—random dollops create the best marble effect. Gently swirl with a knife in figure-eight patterns, but don’t overmix or colors will muddy.
Pro Tip: The swirling technique makes or breaks this dessert. Three gentle figure-eight motions maximum. More than that and you’ll create brown instead of rainbow.

Step 6: Perfect the Ganache Drip Heat milk and remaining cream in a small saucepan until just warm to touch—not boiling. Remove from heat and add your choice of food coloring for the drip effect. I prefer a coordinating color or classic white for elegant contrast. Add extra powdered sugar if mixture seems too thin.
Pro Tip: Test your drip consistency on the side of a glass first. Perfect drips run slowly down the edge without pooling at the bottom.
Creative Variations for Every Occasion
Birthday Cake Oreo Version: Substitute Golden Oreos and add 2 tablespoons of rainbow sprinkles to each colored layer. Use clear vanilla extract to maintain bright colors, and finish with birthday cake-flavored drip by adding 1/2 teaspoon of almond extract to your ganache. This version tastes remarkably like funfetti cake but with cheesecake sophistication.
Seasonal Holiday Adaptation: For Christmas, create red and green layers only, using peppermint extract instead of vanilla. Crush candy canes into the Oreo crust for textural surprise. For Halloween, use orange and black food coloring with chocolate sandwich cookies, adding 1 tablespoon of cocoa powder to deepen the chocolate flavor.
Keto-Friendly Version: Replace granulated sugar with erythritol (use 3/4 cup), substitute powdered sugar with powdered erythritol, and use sugar-free chocolate sandwich cookies for the crust. This reduces carbs from 32g to 8g per slice while maintaining the same creamy texture and visual impact.
Make-Ahead Mastery
This cheesecake actually improves with time, making it perfect for meal prep and party planning. The flavors meld beautifully over 24-48 hours, creating even more depth. Prepare the entire cake up to three days in advance, but wait to add the drip and decorative toppings until serving day to maintain their visual impact.
For optimal make-ahead results, wrap the finished cake (without drip) tightly in plastic wrap, then aluminum foil. The double wrapping prevents freezer burn and flavor absorption from other refrigerator items. When ready to serve, let it sit at room temperature for 15 minutes before adding final touches—this slight warming enhances the creamy texture.
Scaling Guide for Crowd-Pleasing
To double this recipe for a 10-inch springform pan, multiply all ingredients by 1.5 rather than 2—the larger surface area requires less height for visual impact. Increase chilling time to 6 hours minimum. For mini individual cheesecakes, use this recipe to fill 18 muffin cups lined with paper liners, reducing chill time to 2 hours.
Perfect Pairings
Wine pairing might seem unusual with such a playful dessert, but a crisp Prosecco or Moscato d’Asti complements the creamy richness beautifully. For non-alcoholic options, serve with cold brew coffee or vanilla-infused milk. The contrast between the coffee’s bitterness and the cake’s sweetness creates sophisticated balance.
Storage and Leftover Magic
Store covered in the refrigerator for up to one week—though it rarely lasts that long. Leftover slices can be frozen individually wrapped for up to three months. For an unexpected leftover transformation, crumble day-old cake into parfait glasses with fresh berries and additional whipped cream for an elegant trifle.
Nutritional Analysis (per slice):
- Calories: 385
- Fat: 28g (72% of calories)
- Carbohydrates: 32g (22% of calories)
- Protein: 12g (6% of calories)
- Fiber: 2g
- Sugar: 28g
- Sodium: 245mg
The high fat content provides satiety, while the protein from cream cheese makes this more nutritionally substantial than typical layer cakes. The moderate portion size allows for indulgence without excessive caloric impact.
Comprehensive FAQ Section
Q: My colors turned muddy instead of staying vibrant. What went wrong? A: This happens from overmixing during the swirling step. Limit yourself to exactly three figure-eight motions with your knife. Also, gel food coloring maintains intensity better than liquid versions. If your colors did muddy, embrace it—you’ve created a beautiful tie-dye effect that’s equally Instagram-worthy.
Q: Can I substitute the cream cheese with a lighter alternative? A: Yes, but with texture considerations. Neufchâtel cheese (1/3 less fat) works well using a 1:1 ratio. Greek cream cheese creates tangier flavor. Avoid fat-free cream cheese—it contains stabilizers that prevent proper setting. For dairy-free, use cashew cream cheese, but add 2 tablespoons of cornstarch for structure.
Q: My cheesecake didn’t set properly after 4 hours. What’s the fix? A: Several factors affect setting time. First, ensure your cream was whipped to proper stiff peaks—underwhipped cream won’t provide structure. Second, check your refrigerator temperature (should be 35-38°F). Third, humidity affects setting time—allow up to 6 hours in humid conditions. If still soft after 6 hours, place in freezer for 30 minutes, then return to refrigerator.
Q: The drip ganache hardened too quickly. How do I get smooth drips? A: Temperature control is crucial. Your ganache should be warm to touch but not hot—about 80-85°F is perfect. If it hardened, gently rewarm in 10-second microwave intervals, stirring between each. Working quickly is key, or have a helper pour while you rotate the cake.
Q: Can I make this without a springform pan? A: Absolutely. Use a regular 8-inch cake pan lined with parchment paper, leaving overhang for easy removal. You can also use a tart pan with removable bottom, or even make individual portions in 6-ounce ramekins. Adjust chilling time to 2-3 hours for smaller portions.
Q: How do I prevent the Oreo crust from getting soggy? A: The pre-baking step is essential—don’t skip it. Also, ensure the crust is completely cool before adding filling. For extra protection, brush the cooled crust with a thin layer of melted white chocolate and let set for 10 minutes before adding the cheesecake mixture.
Advanced Techniques & Professional Tips
The key to professional results lies in understanding the science behind no-bake cheesecakes. The structure comes entirely from the whipped cream and the gelatin naturally present in cream cheese. This is why ingredient temperatures matter so much—cold ingredients won’t incorporate properly, leading to texture issues.
For color theory enthusiasts, remember that food coloring behaves differently in dairy-based mixtures. Reds tend to fade fastest, so add slightly more. Blues and purples intensify over time, so start conservatively. Yellow and orange remain most stable. Professional bakers often add a tiny drop of white food coloring to intensify other colors.
Storage and Food Safety Guidelines
This dessert contains dairy products that require proper refrigeration. Never leave at room temperature for more than 2 hours. When transporting, use a cooler with ice packs. The cake can be frozen for up to 3 months—wrap individual slices for portion control. Thaw in refrigerator overnight, never at room temperature.
Cost Analysis and Shopping Tips
This recipe typically costs $12-15 to make, serving 10 people at roughly $1.20-1.50 per serving—significantly less expensive than bakery alternatives. Buy cream cheese in bulk when on sale and freeze for up to 3 months. Heavy cream often goes on sale during holiday seasons—stock up and freeze in ice cube trays for future use.
Connect and Share Your Success
I’d love to see your rainbow creations! Tag your photos with #RainbowOreoMagic and share your color combinations. Did you try the seasonal variations? Leave a comment below with your favorite flavor twist. For more advanced cheesecake techniques and seasonal recipe variations, subscribe to our newsletter where I share monthly flavor innovations and behind-the-scenes kitchen tips.
This recipe represents years of refinement and testing, but the joy it brings to celebrations makes every colorful experiment worthwhile. Whether you’re making it for a child’s birthday or surprising adults with nostalgic flavors, this Rainbow Oreo Cheesecake Drip Cake proves that sometimes the most beautiful desserts come from combining simple pleasures in unexpected ways.
Rainbow Oreo Cheesecake Drip Cake
Ingredients
- 1½ cups crushed Oreos regular, not Double Stuf
- ½ cup unsalted butter melted
- 2 cups cream cheese softened
- 1 cup granulated sugar
- 1 teaspoon vanilla extract
- 2 cups heavy cream 35-40% fat, cold
- ¼ cup powdered sugar
- ¼ cup whole milk
- Gel food coloring red, orange, yellow, green, blue, purple
Instructions
- Prepare Oreo Crust:
- Preheat oven to 350°F (175°C). Grease and line an 8-inch springform pan. Mix crushed Oreos with melted butter until combined. Press firmly into pan bottom. Bake for exactly 10 minutes. Cool completely.
- Make Cream Cheese Base:
- Beat softened cream cheese on medium speed for 3 minutes until smooth. Gradually add granulated sugar, mixing 2 more minutes. Add vanilla extract and combine.
- Whip Cream:
- In a separate bowl, whip heavy cream and powdered sugar to stiff peaks (~3-4 minutes). Fold gently into cream cheese mixture.
- Divide & Color:
- Divide mixture equally into six bowls. Add gel food coloring by drop to achieve red, orange, yellow, green, blue, and purple. Mix thoroughly.
- Layer & Swirl:
- Dollop colored mixtures randomly over crust. Use a knife to swirl gently in up to three figure-eight motions to create marbled rainbow pattern.
- Chill:
- Refrigerate for at least 4 hours to set.
- Prepare Ganache Drip:
- Heat milk and remaining cream until warm. Add food coloring and powdered sugar as needed for drip consistency. Cool slightly before pouring over chilled cake.
- Serve:
- Add desired decorations and slice to serve.