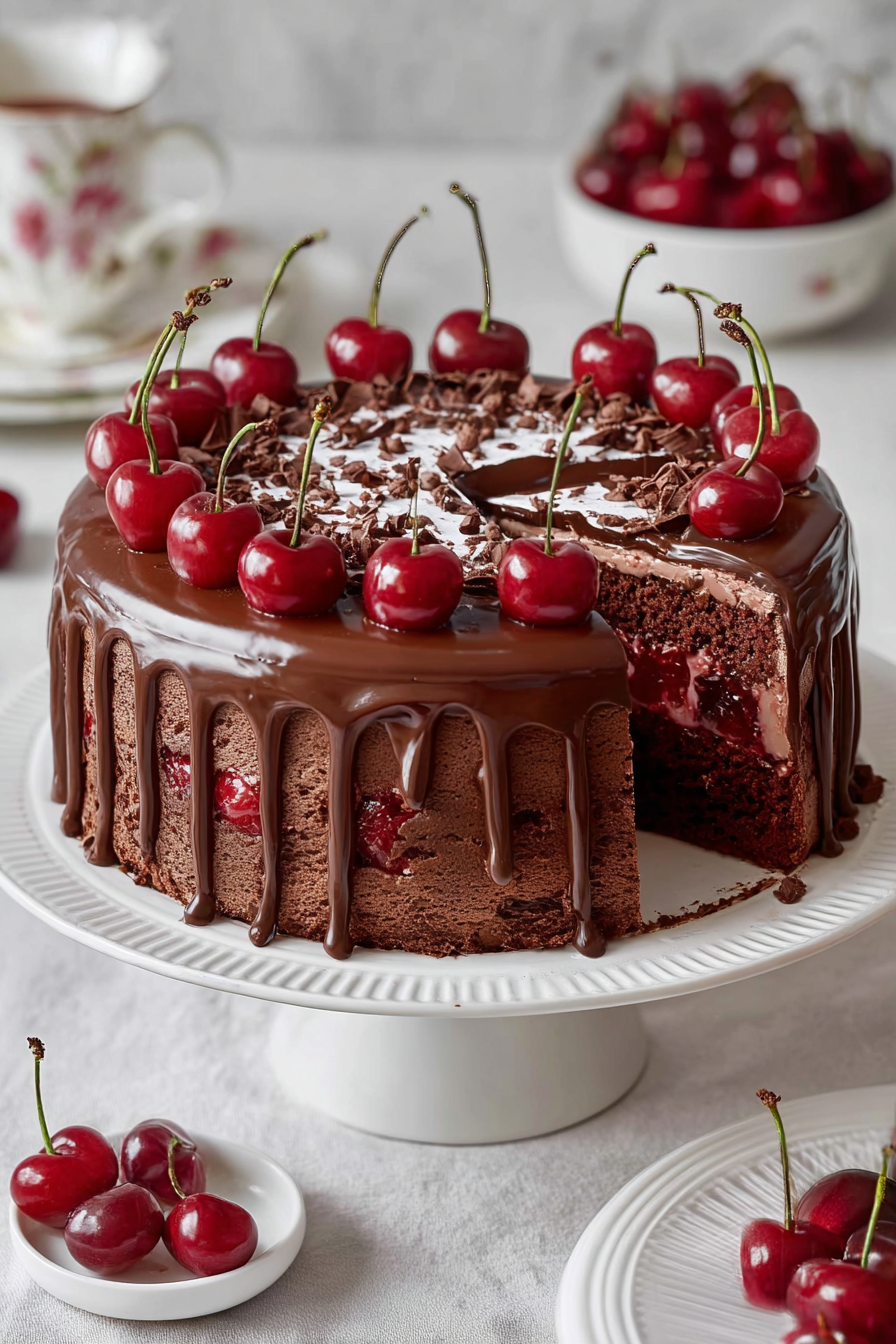
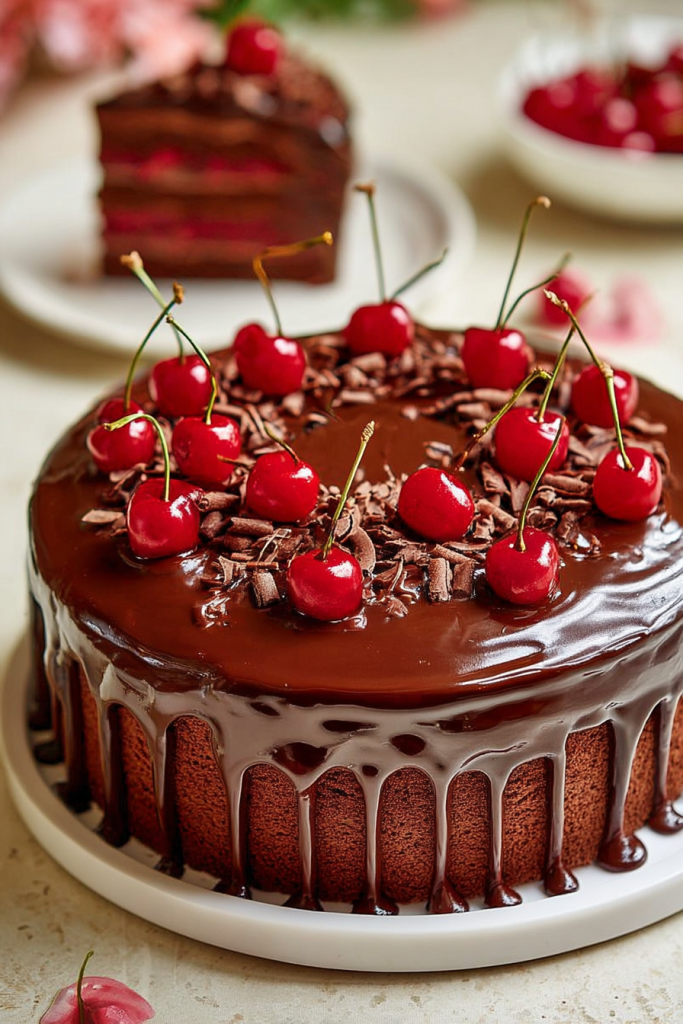
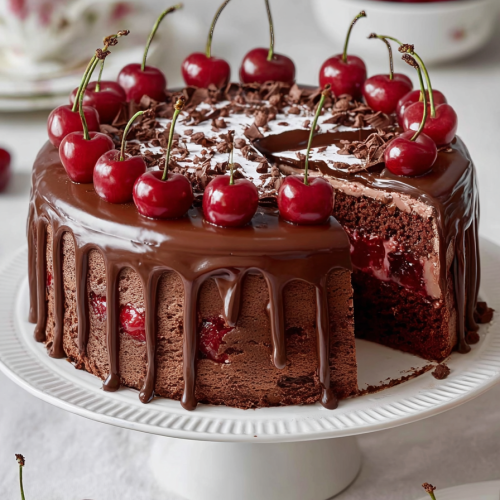
There’s something magical about the combination of rich chocolate and tart cherries that never fails to make my heart skip a beat. When I first created this Chocolatey Cherry Bliss Cake, I was searching for the perfect dessert to celebrate my daughter’s birthday – something that would capture both the indulgence she craved and the sophistication I wanted to showcase. After several kitchen experiments and more than a few taste tests (the hardest part of recipe development, truly!), this stunning three-layer masterpiece was born.

What makes this Chocolatey Cherry Bliss Cake so special isn’t just its show-stopping appearance – though the deep chocolate layers contrasted with vibrant cherry filling certainly make for an Instagram-worthy dessert. It’s the perfect balance of flavors and textures that sets it apart from other chocolate cherry cakes I’ve tried. The moist, tender chocolate cake layers provide a rich foundation, while the homemade cherry filling adds that perfect pop of tartness that cuts through the sweetness beautifully.
I’ve discovered that the secret to achieving the ultimate chocolate flavor lies in using both unsweetened cocoa powder and the surprising addition of boiling water to the batter. This technique, which I learned from my grandmother’s old recipe collection, helps bloom the cocoa and creates an incredibly deep, complex chocolate taste that store-bought mixes simply can’t match. The buttermilk adds tanginess and ensures the cake stays incredibly moist for days.
The cherry filling is where this recipe truly shines. I prefer using fresh cherries when they’re in season – typically late spring through early summer – but high-quality canned cherries work beautifully year-round. The key is in the preparation: cooking them down with just enough sugar and cornstarch to create a glossy, jam-like consistency that won’t make your cake layers soggy.
Over the years, I’ve served this Chocolatey Cherry Bliss Cake at countless gatherings – from intimate family dinners to large holiday celebrations – and it never fails to impress. The combination of the three distinct components creates a dessert that’s both familiar and exciting, comforting yet elegant enough for special occasions.
What I love most about this recipe is its versatility. While it’s absolutely stunning as a special occasion cake, the individual components can be prepared ahead of time, making it surprisingly manageable for busy home bakers. The cake layers can be baked and frozen for up to three months, the cherry filling keeps beautifully in the refrigerator for up to a week, and even the frosting can be made a day ahead.
Whether you’re planning a birthday celebration, looking for the perfect ending to a dinner party, or simply want to treat yourself to something extraordinary, this Chocolatey Cherry Bliss Cake delivers on every level. The rich chocolate, tart cherries, and creamy frosting create a harmony of flavors that will have your guests asking for the recipe – and trust me, you’ll be proud to share it.
Recipe Timing & Difficulty
| Prep Time | Cook Time | Total Time | Servings | Difficulty |
|---|---|---|---|---|
| 30 minutes | 35 minutes | 2 hours 15 minutes (including cooling) | 12 slices | Intermediate |
Ingredients Table
| Ingredient | Quantity | Notes |
|---|---|---|
| For the Cake: | ||
| All-purpose flour | 1 3/4 cups | Sift for best results |
| Granulated sugar | 1 1/2 cups | Regular white sugar |
| Unsweetened cocoa powder | 3/4 cup | Dutch-processed preferred |
| Baking powder | 1 1/2 teaspoons | Check expiration date |
| Baking soda | 1 teaspoon | Fresh for best rise |
| Salt | 1/2 teaspoon | Fine sea salt works best |
| Large eggs | 2 | Room temperature |
| Buttermilk | 1 cup | Can substitute with milk + vinegar |
| Vegetable oil | 1/2 cup | Neutral flavor oil |
| Vanilla extract | 2 teaspoons | Pure vanilla preferred |
| Boiling water | 1 cup | Critical for chocolate flavor |
| For the Cherry Filling: | ||
| Fresh or canned cherries | 2 cups | Pitted, drained if canned |
| Granulated sugar | 1/2 cup | Adjust based on cherry sweetness |
| Cornstarch | 1 tablespoon | For thickening |
| Lemon juice | 1 tablespoon | Fresh squeezed preferred |
| For the Frosting: | ||
| Unsalted butter | 1 cup | Room temperature, softened |
| Powdered sugar | 4 cups | Sifted to avoid lumps |
| Unsweetened cocoa powder | 1/2 cup | Same type as cake |
| Heavy cream | 1/4 cup | 35% fat content |
| Vanilla extract | 1 teaspoon | Pure vanilla extract |
Step-by-Step Instructions
Preparing the Chocolate Cake Layers:
Begin by preheating your oven to 350°F (175°C) – this temperature is crucial for achieving the perfect texture in your Chocolatey Cherry Bliss Cake. Grease two 9-inch round cake pans thoroughly with butter, then dust with cocoa powder instead of flour for extra chocolate flavor. This small detail makes a noticeable difference in the final taste.
In a large mixing bowl, whisk together the flour, sugar, cocoa powder, baking powder, baking soda, and salt. I always recommend sifting the cocoa powder to eliminate any lumps that could create pockets of bitterness in your finished cake. Create a well in the center of these dry ingredients.
In a separate bowl, whisk together the eggs, buttermilk, vegetable oil, and vanilla extract until well combined. Pour this wet mixture into the well of dry ingredients and mix until just combined. The batter will look thick at this stage – don’t worry, that’s exactly what we want.
Here’s where the magic happens: slowly stir in the boiling water. The batter will become quite thin, almost like a thick soup. This is perfect! The hot water helps bloom the cocoa powder, intensifying the chocolate flavor dramatically. Pro tip: Make sure your water is actually boiling when you add it – lukewarm water won’t achieve the same effect.
Divide the batter evenly between your prepared pans and bake for 30-35 minutes, or until a toothpick inserted in the center comes out with just a few moist crumbs. Don’t overbake – these cakes continue cooking slightly from residual heat even after removing from the oven.
Creating the Perfect Cherry Filling:
While your cakes cool, prepare the star of this Chocolatey Cherry Bliss Cake – the cherry filling. In a medium saucepan, combine the pitted cherries, sugar, cornstarch, and lemon juice. If using fresh cherries, they’ll release their natural juices as they cook. Canned cherries should be drained first, but reserve about 1/4 cup of the juice to add if the mixture seems too thick.
Cook over medium heat, stirring constantly, until the mixture thickens and becomes glossy – typically 8-10 minutes. The cornstarch will activate and create a beautiful, jam-like consistency that won’t make your cake soggy. Remove from heat and let cool completely before assembling your cake.
Mastering the Chocolate Frosting:
For the frosting that crowns this Chocolatey Cherry Bliss Cake, beat the softened butter until light and fluffy – about 3-4 minutes with an electric mixer. Gradually add the powdered sugar and cocoa powder, alternating between the two. Finally, add the heavy cream and vanilla, beating until the frosting is smooth and spreadable.
Assembly Magic:
Place one cake layer on your serving plate, spread half the cherry filling evenly across the top, add the second layer, and finish with the remaining cherry filling and the final layer. Apply the frosting in a smooth, even layer across the top and sides. The result is a stunning Chocolatey Cherry Bliss Cake that’s as beautiful as it is delicious.
Pro Tips for Perfect Results
Creating the perfect Chocolatey Cherry Bliss Cake requires attention to detail, but these professional tips will ensure your success every time. First, always bring your eggs and buttermilk to room temperature before mixing – this creates a smoother batter and more even texture in your finished cake. If you’re short on time, place eggs in warm water for 10 minutes and microwave buttermilk for 30 seconds.
When measuring cocoa powder, I always recommend the “spoon and level” method rather than scooping directly from the container. This prevents over-packing, which can make your Chocolatey Cherry Bliss Cake too dense. Additionally, if your cocoa powder seems lumpy, sift it twice – once before measuring and once after adding it to your dry ingredients.
For the cherry filling, don’t skip the lemon juice! It not only adds brightness that balances the sweetness but also helps the cornstarch thicken properly. If your cherries are particularly tart, taste the mixture while cooking and adjust the sugar accordingly. Remember, the filling will taste less sweet once paired with the rich chocolate cake.
Creative Variations
While this Chocolatey Cherry Bliss Cake is perfection as written, there are several variations worth exploring. For a more adult version, add 2 tablespoons of kirsch (cherry brandy) to the cherry filling. The alcohol cooks off, leaving behind a sophisticated flavor that pairs beautifully with chocolate.
You can also transform this into individual cupcakes – simply divide the batter among 24 cupcake liners and bake for 18-20 minutes. Top each with a dollop of cherry filling and a swirl of frosting for an elegant presentation.
For chocolate cherry enthusiasts, try folding 1/2 cup of mini chocolate chips into the batter before baking. This creates delightful pockets of extra chocolate throughout each slice of your Chocolatey Cherry Bliss Cake.
Storage and Make-Ahead Tips
This cake actually improves overnight as the flavors meld together. Store covered at room temperature for up to 3 days, or refrigerate for up to a week. The cherry filling can be made up to 5 days ahead and stored in the refrigerator. Both cake layers freeze beautifully for up to 3 months when wrapped tightly in plastic wrap and aluminum foil.
Frequently Asked Questions
Can I use frozen cherries instead of fresh or canned? Absolutely! Thaw frozen cherries completely and drain excess liquid before cooking. You may need to cook the filling slightly longer to achieve the proper consistency, but the flavor will be just as delicious in your Chocolatey Cherry Bliss Cake.
What if I don’t have buttermilk?
Create a substitute by adding 1 tablespoon of white vinegar or lemon juice to 1 cup of regular milk. Let it sit for 5 minutes until it curdles slightly. This acidic milk will provide the same tangy flavor and tender texture.
Can I make this cake gluten-free?
Yes! Substitute the all-purpose flour with a 1:1 gluten-free flour blend that contains xanthan gum. The texture will be slightly different but still delicious.
How do I prevent the cherry filling from making the cake soggy?
Ensure your cherry filling is completely cool before assembling, and don’t spread it all the way to the edges of the cake layers. Leave about a 1/2-inch border, and the weight of the top layer will naturally spread the filling to the edges without oversaturating the cake.
Can I reduce the sugar in this recipe?
The sugar in the cake provides structure as well as sweetness, so I don’t recommend reducing it by more than 1/4 cup. However, you can easily adjust the sugar in the cherry filling based on your taste preferences and the natural sweetness of your cherries.
This Chocolatey Cherry Bliss Cake represents the perfect marriage of rich chocolate and bright cherry flavors, creating a dessert that’s both impressive and achievable for home bakers of all skill levels.
Chocolatey Cherry Bliss Cake
Ingredients
- For the Cake:
- 1 3/4 cups all-purpose flour sifted
- 1 1/2 cups granulated sugar
- 3/4 cup unsweetened cocoa powder Dutch-processed preferred
- 1 1/2 teaspoons baking powder
- 1 teaspoon baking soda
- 1/2 teaspoon fine sea salt
- 2 large eggs room temperature
- 1 cup buttermilk or milk + vinegar substitute
- 1/2 cup vegetable oil neutral flavor
- 2 teaspoons pure vanilla extract
- 1 cup boiling water critical for chocolate flavor
- For the Cherry Filling:
- 2 cups fresh or canned cherries pitted, drained if canned
- 1/2 cup granulated sugar adjust based on cherry sweetness
- 1 tablespoon cornstarch
- 1 tablespoon fresh lemon juice
- For the Frosting:
- 1 cup unsalted butter room temperature, softened
- 4 cups powdered sugar sifted
- 1/2 cup unsweetened cocoa powder same type as cake
- 1/4 cup heavy cream 35% fat content
- 1 teaspoon pure vanilla extract
Instructions
- Prepare Cake Layers:
- Preheat oven to 350°F (175°C). Grease and dust two 9-inch pans with cocoa powder.
- Whisk flour, sugar, cocoa, baking powder, baking soda, and salt. Create a well.
- In another bowl, whisk eggs, buttermilk, oil, vanilla. Combine with dry ingredients until just mixed.
- Slowly add boiling water, stirring until smooth and thin.
- Divide batter evenly; bake 30–35 minutes. Test with toothpick. Cool completely.
- Make Cherry Filling:
- Combine cherries, sugar, cornstarch, and lemon juice in a saucepan.
- Cook over medium heat, stirring until thick and glossy (~8-10 mins). Cool before use.
- Prepare Frosting:
- Beat butter until fluffy. Gradually add powdered sugar and cocoa, alternating.
- Add heavy cream and vanilla; beat until smooth and spreadable.
- Assemble Cake:
- Place one cake layer on plate; spread half cherry filling. Add second layer.
- Spread remaining cherry filling, then top with frosting on sides and top.